How I Made this CUSTOM Vampire in CC5 and Unreal Engine

General / 28 November 2025

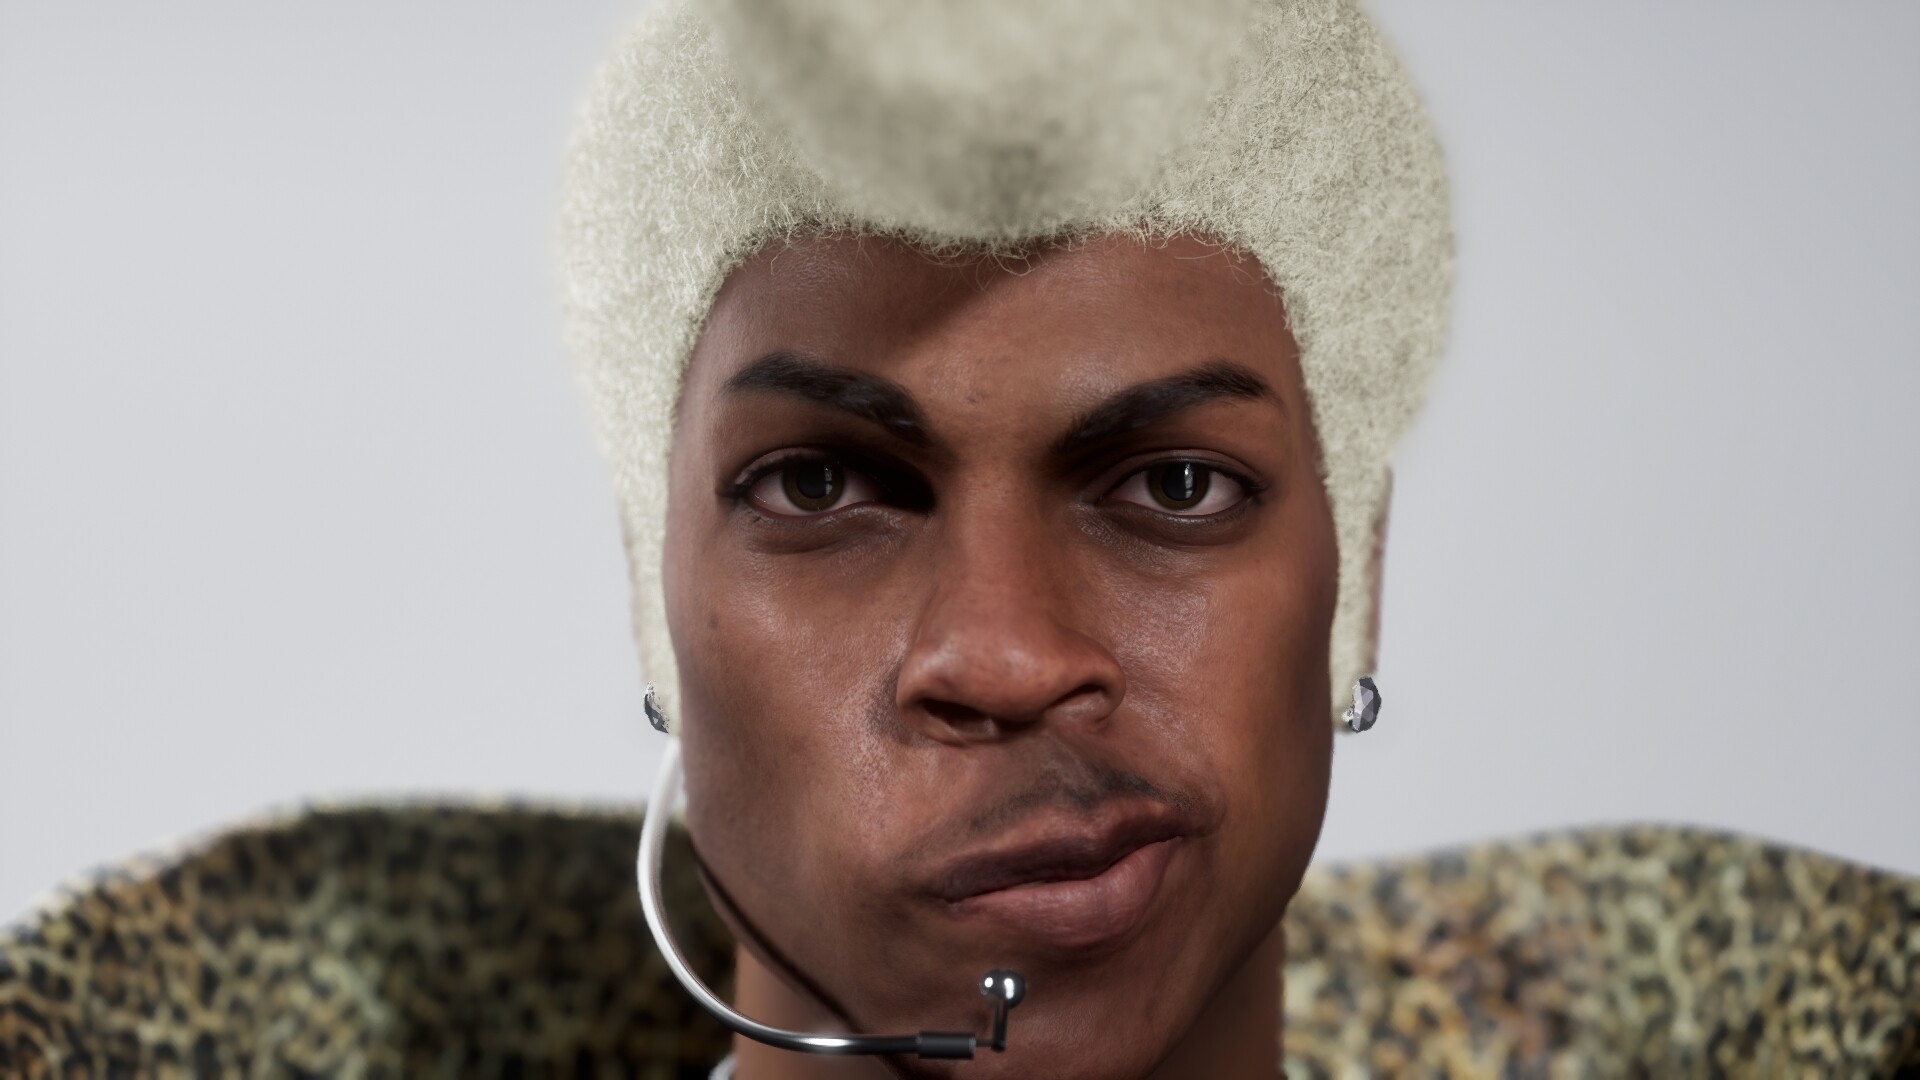
Building a Custom Vampire Character from Scratch with CC5 and Unreal Engine 5.7

Hi, I’m Marlon R. Nuñez, Creative Director at Digito and the creator behind @mrnunez3D in YouTube. With over 13 years of experience in digital humans, real-time workflows, and stylized realism, I’ve worked across games, cinematics, and XR productions. This article breaks down how I built a fully custom vampire character using ZBrush, Character Creator 5, XGen, and Unreal Engine 5.7, testing the limits of CC5’s HD pipeline and real-time integration.


Over the past few weeks, I took on the challenge of creating a fully custom vampire character using ZBrush, Character Creator 5 (CC5), XGen, and Unreal Engine 5.7. This wasn't just about building a stylized character. It was about testing the limits of CC5’s new HD features, grooming workflows, facial animation, and real-time performance inside Unreal Engine. Here’s a breakdown of the entire process.

1. From CC5 blockout to ZBrush sculpt

I started by loading the default male avatar in CC5 as a base. Before even jumping into ZBrush, I used CC5’s powerful morph sliders to block out the overall shape of the character. This is a great starting point because it allows you to quickly define general proportions — like head size, neck length, torso width, and limb shape — all in a non-destructive way. Using morphs not only speeds up the design process but also helps establish a solid base mesh with clean topology, ready for sculpting fine details later on. From there, I exported it into ZBrush to begin sculpting. 


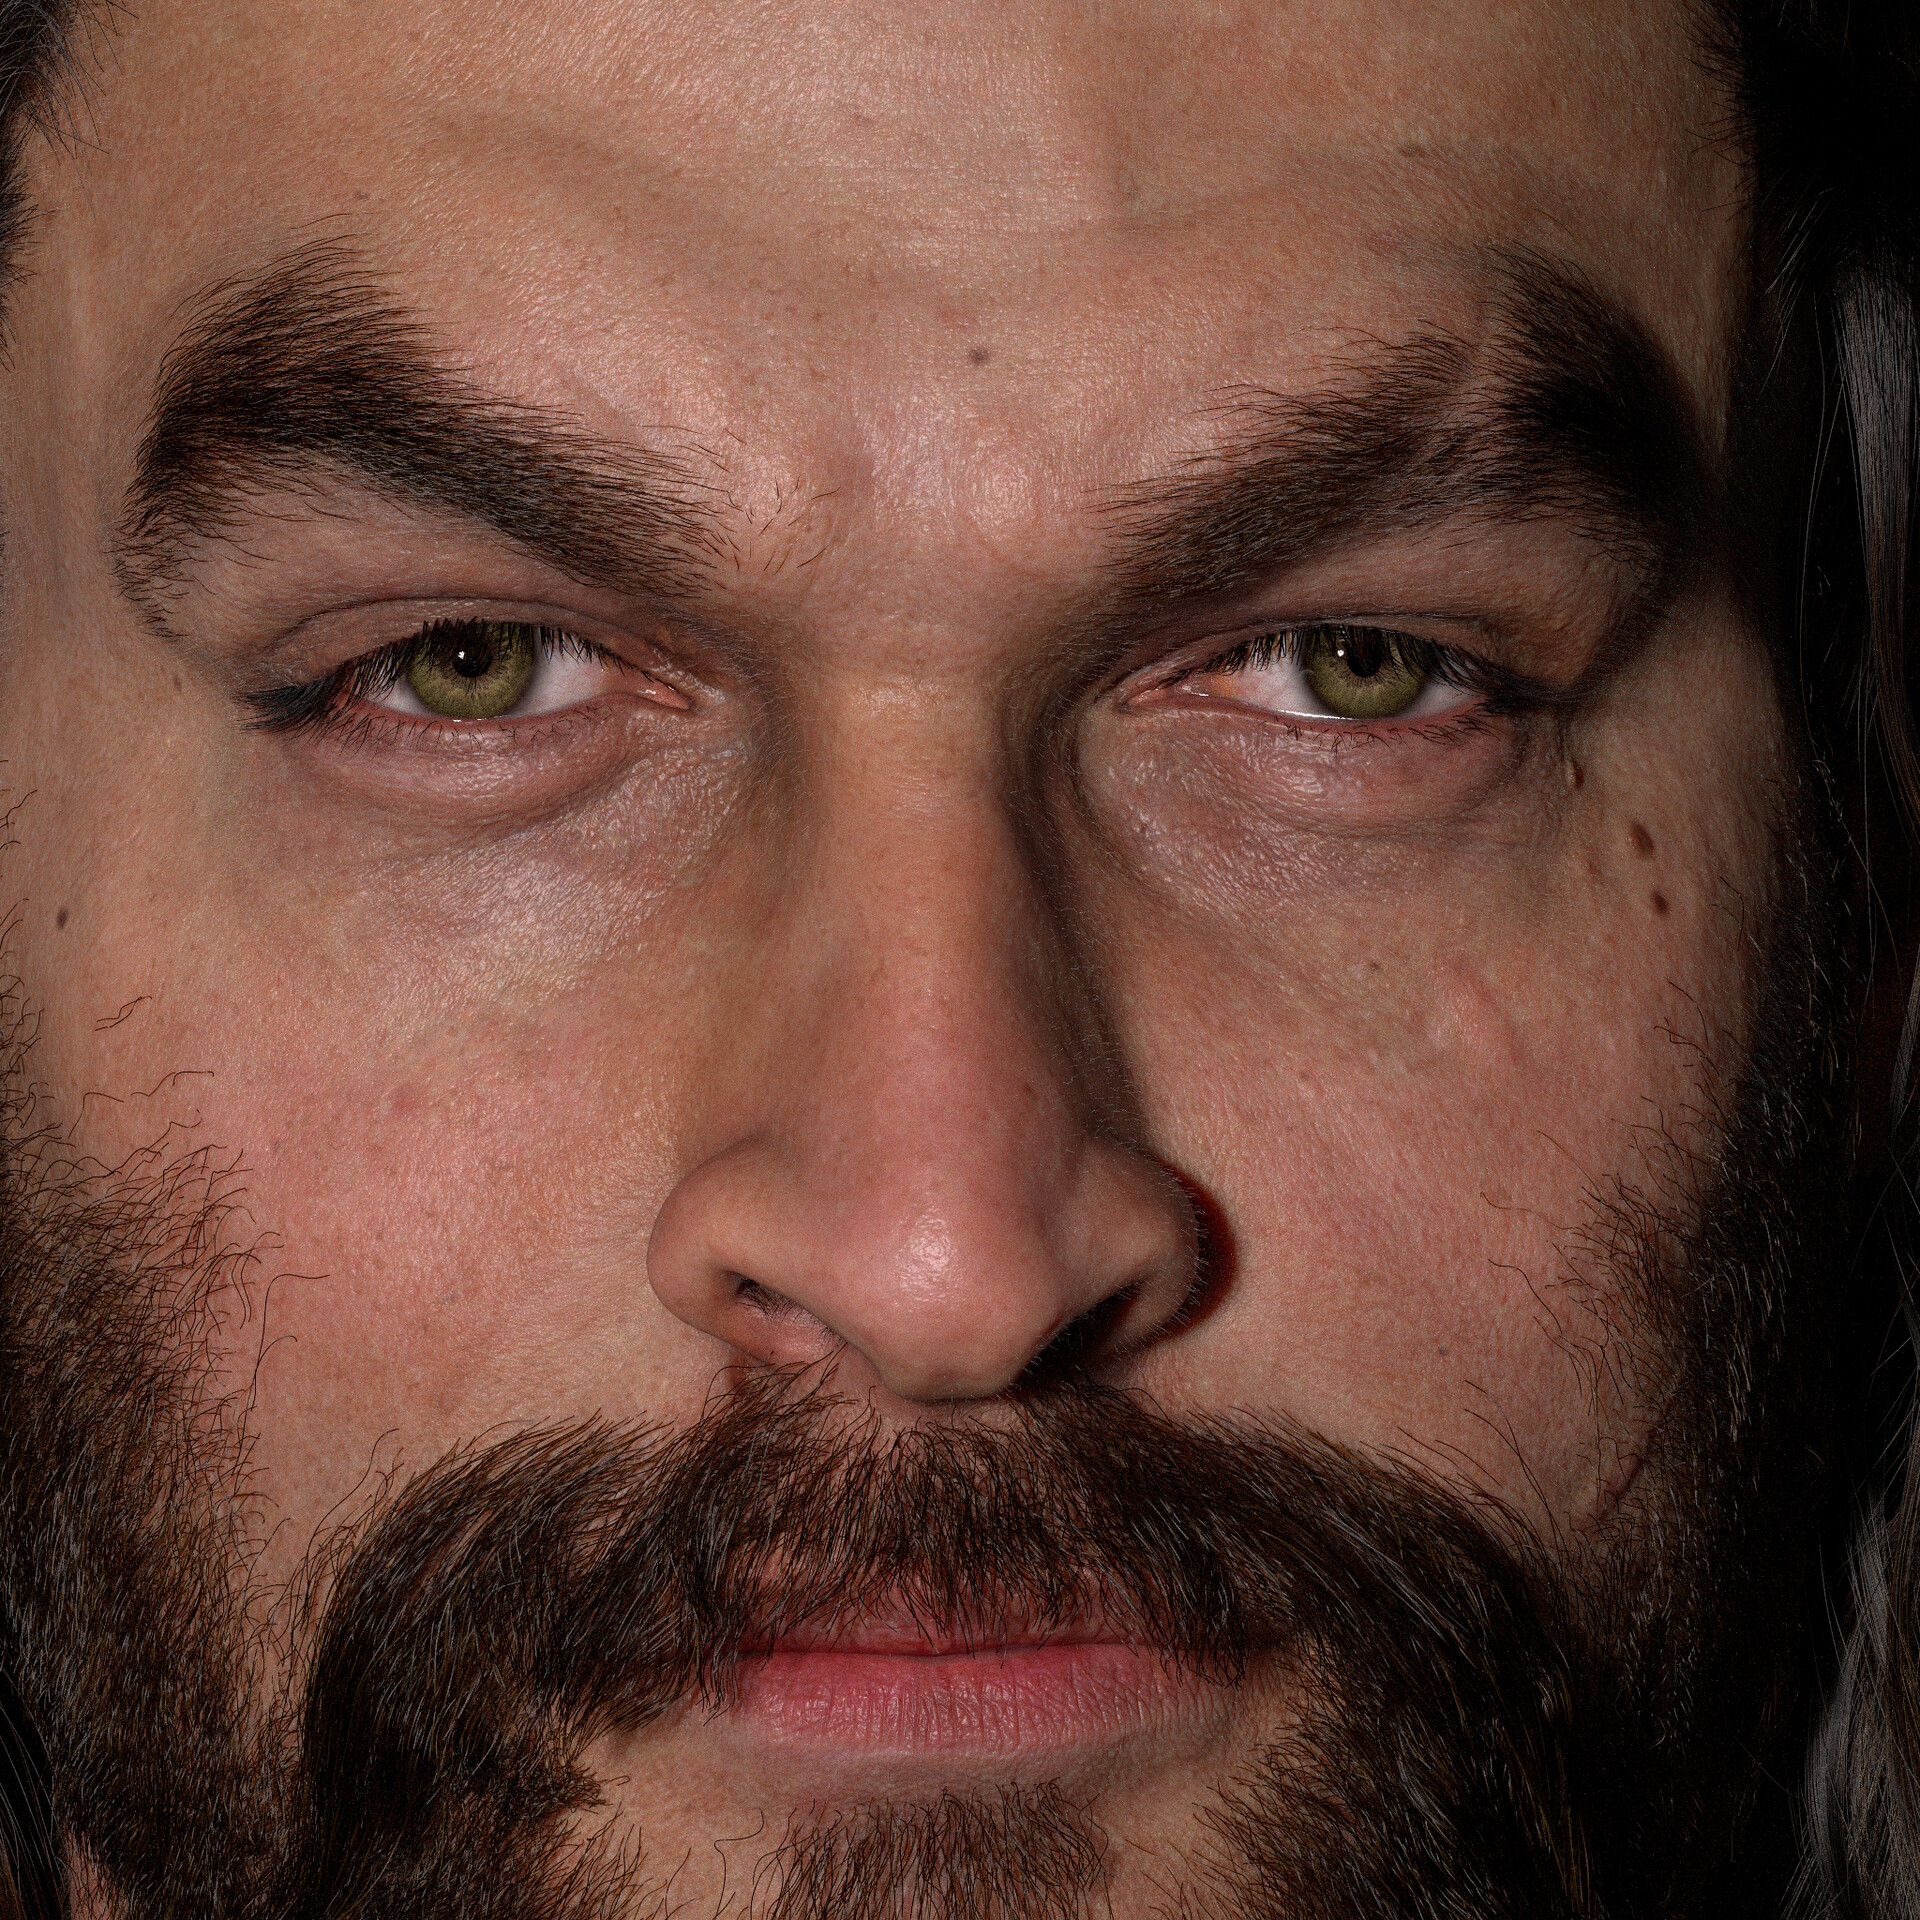
Using a combination of Clay Brush and Dam Standard 2, I carved in wrinkles, secondary forms, and facial structure. This brush combo helped me stay creative and stylize the character without losing realism. Once the primary and secondary forms were working, I used Polypaint to start visualizing the character’s tone.

The goal wasn’t to finalize everything in ZBrush, but rather to set up a clean sculpt ready for HD detailing back in CC5.


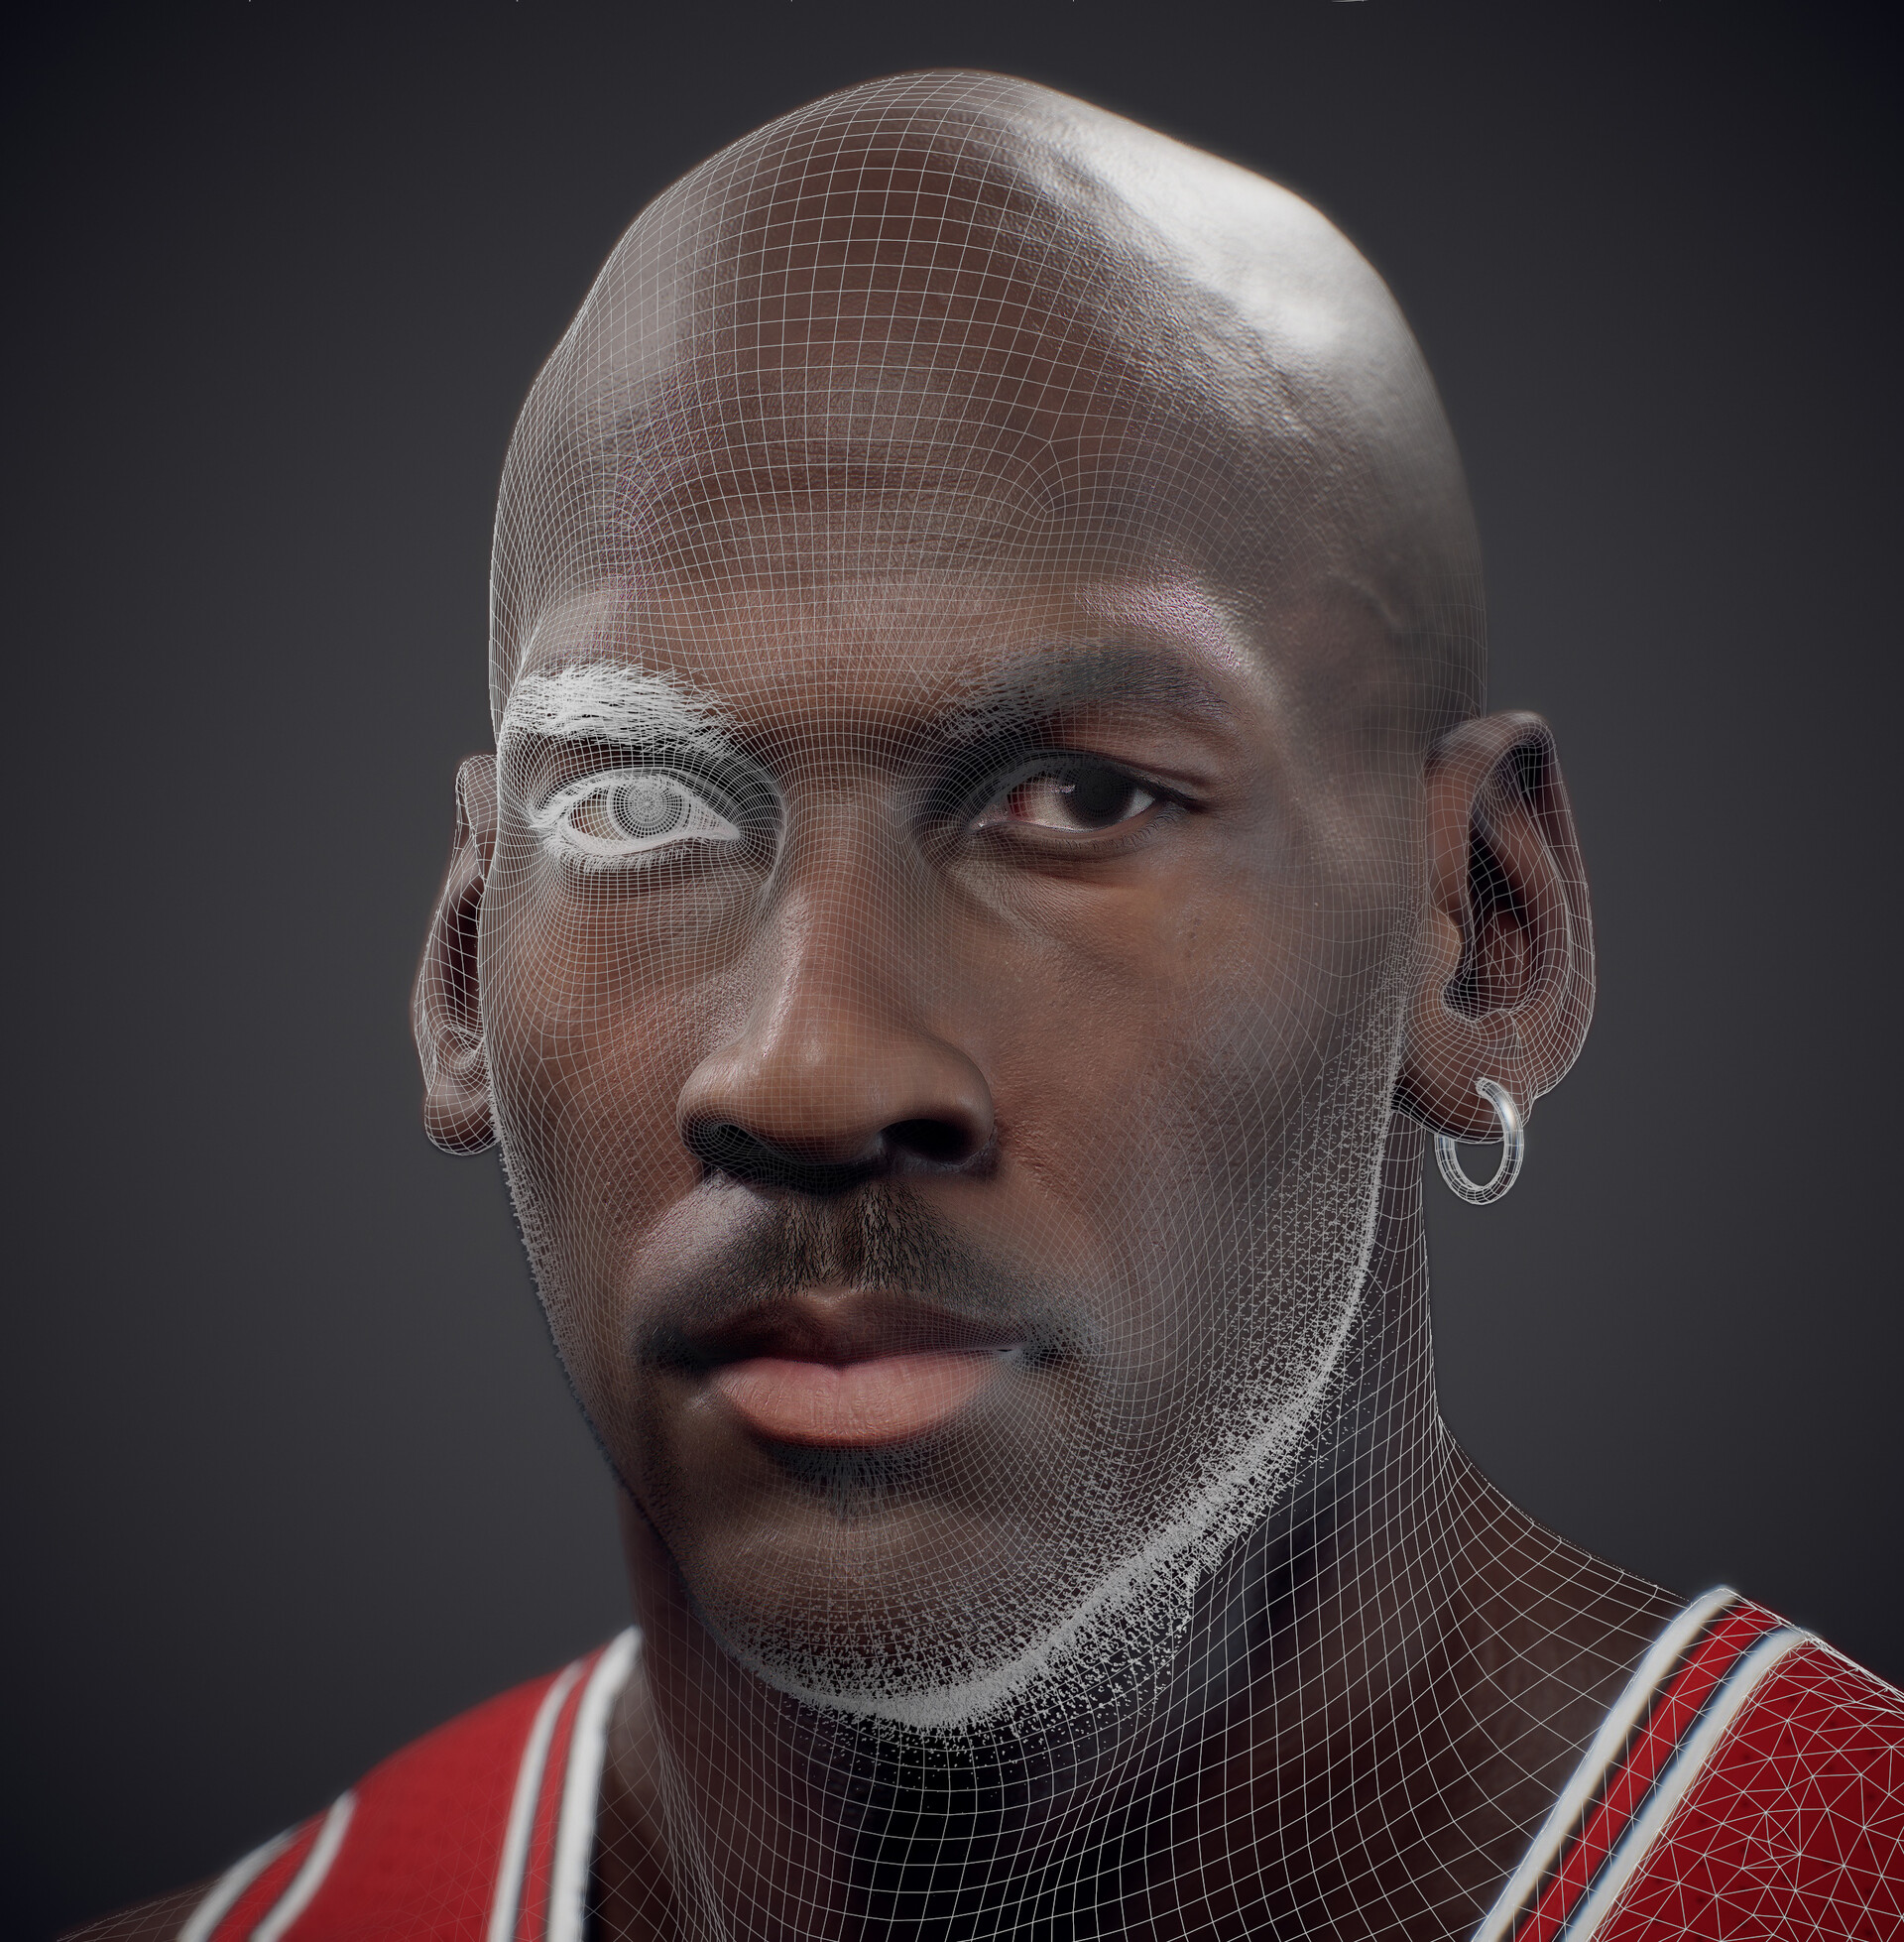
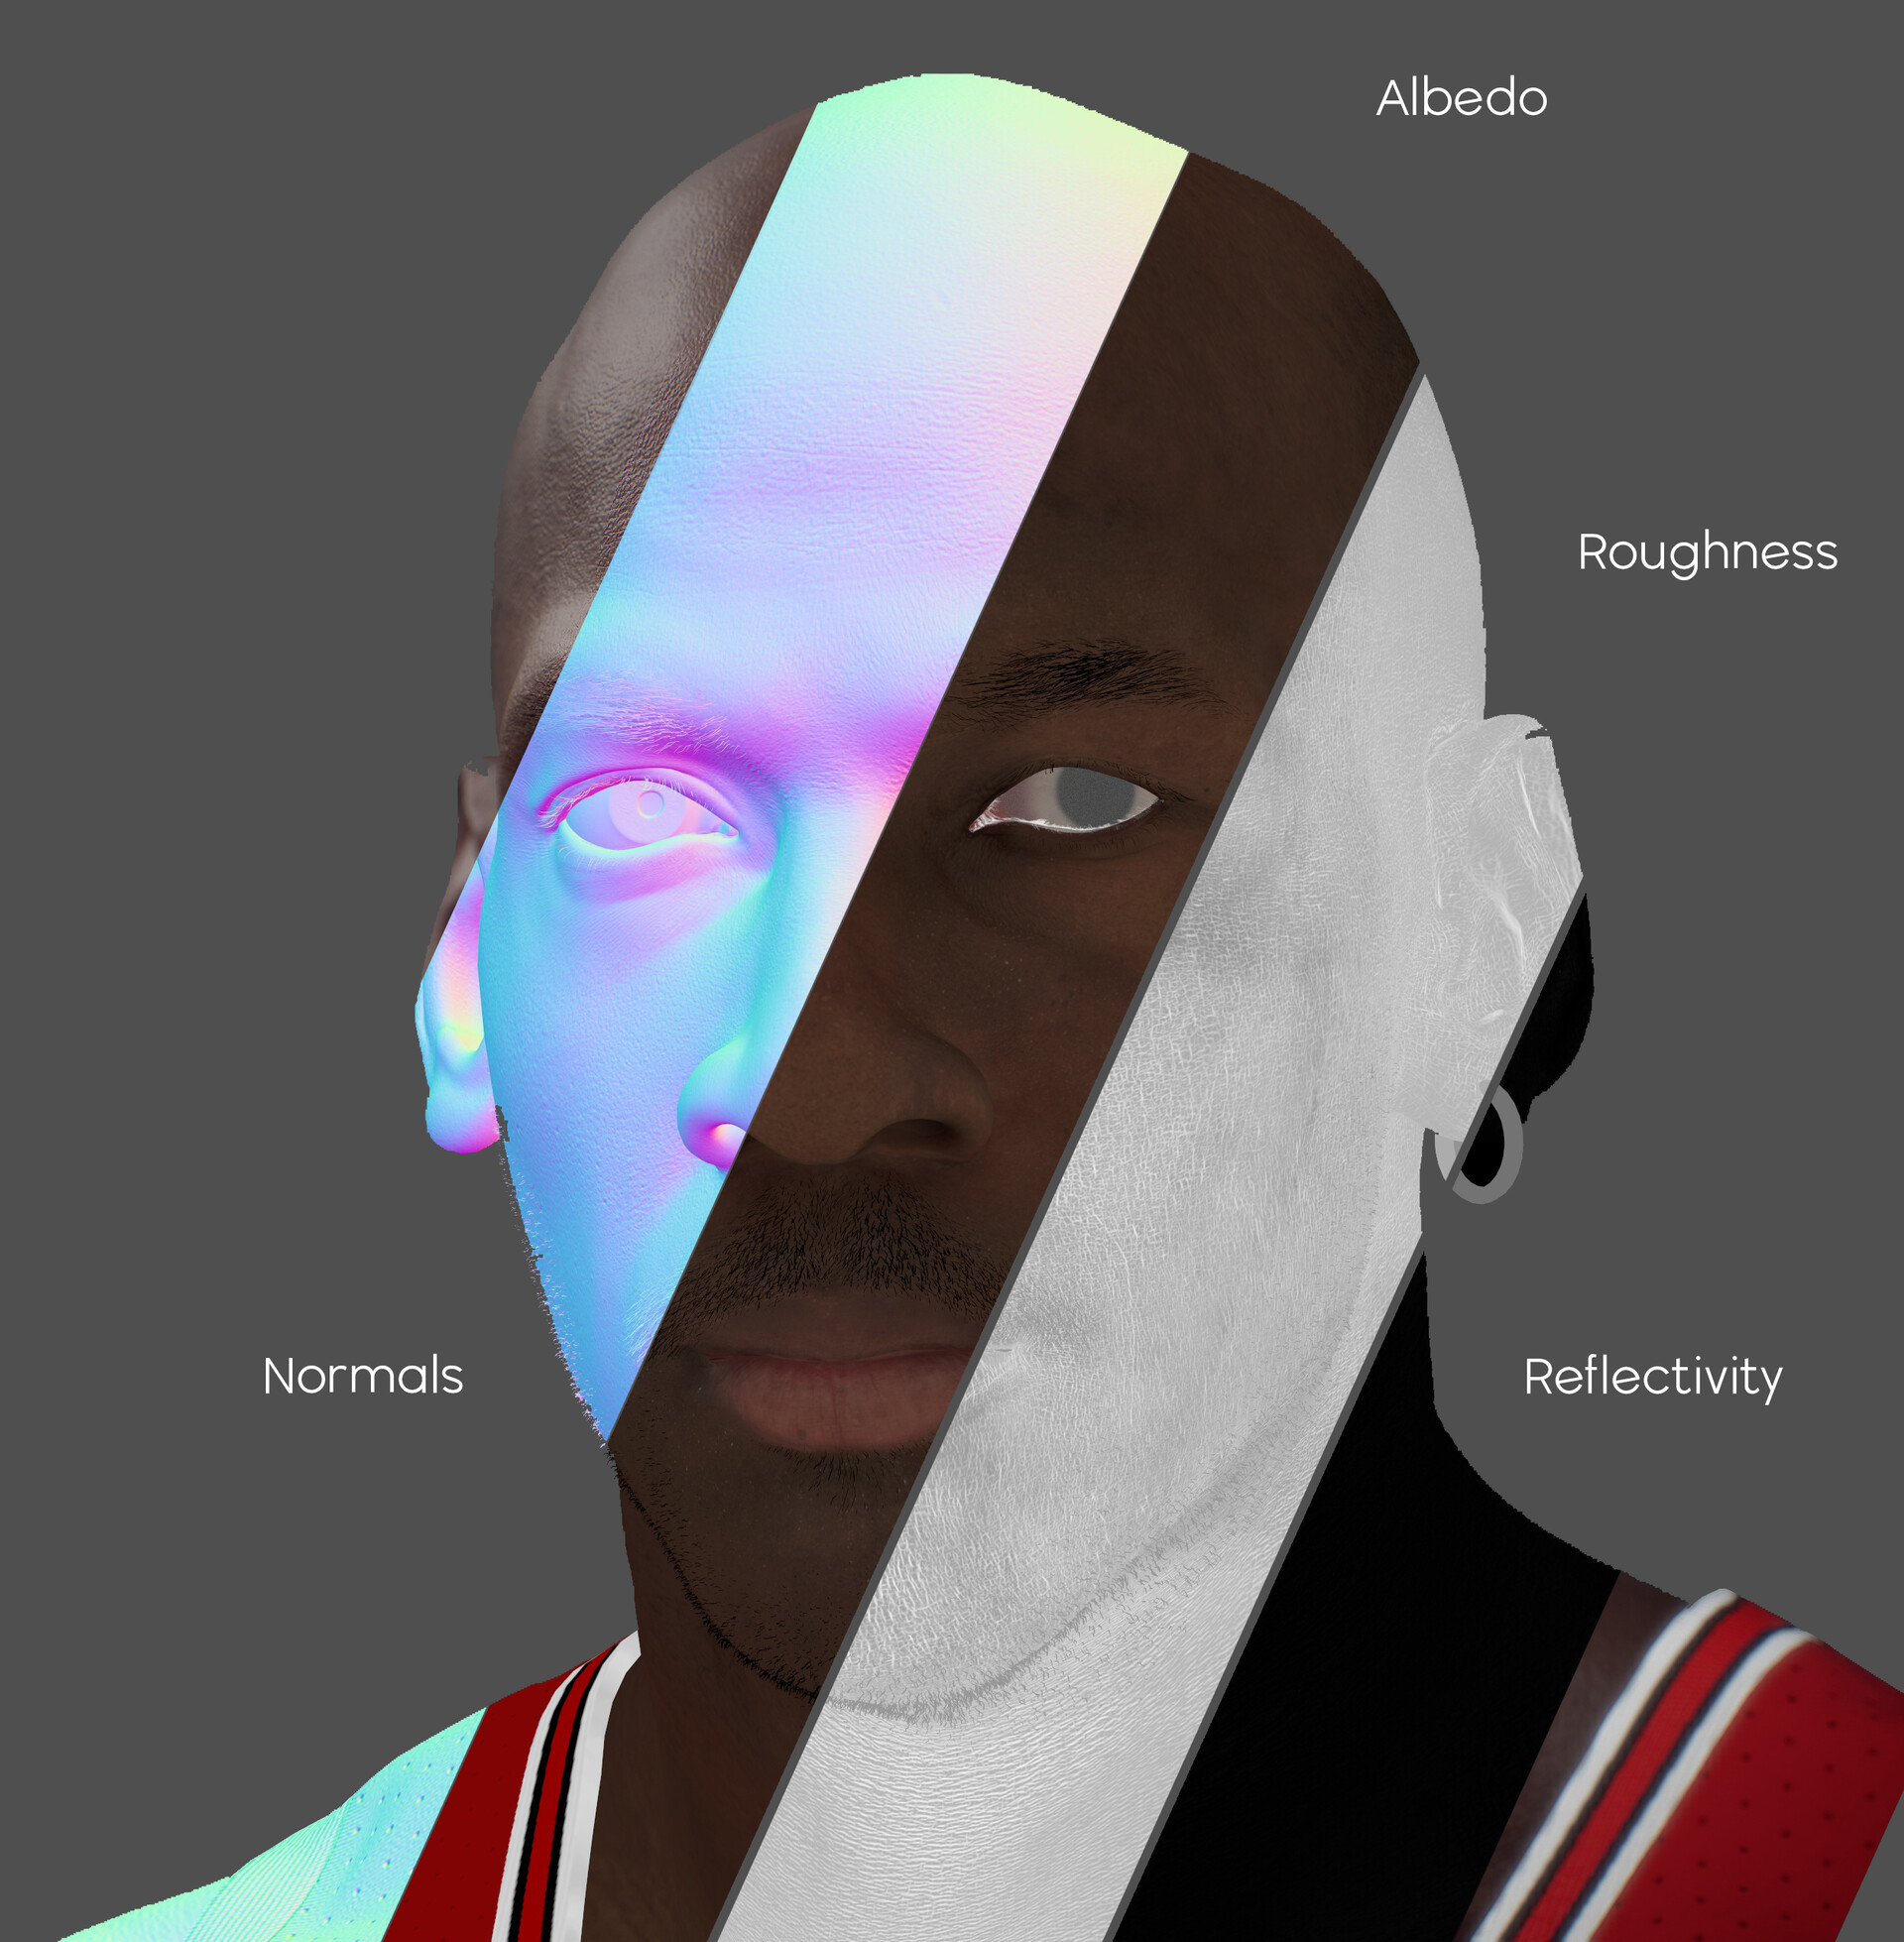
2. Refining with CC5 HD Features

Back in Character Creator 5, I brought in the sculpted mesh using GoZ. The new HD morphs and subdivision tools inside CC5 let me refine anatomical detail without switching back to ZBrush.

I adjusted muscle definition, sharpened key features, and used non-destructive morphs to fine-tune the look. Since the final result would be used in close-up renders and real-time sequences, this HD detailing step was essential.


3. Clothing and CC5 Edit Tools

Because my focus was the face, I didn’t spend time designing clothes from scratch. Instead, I used the free styling clothing pack in CC5 to mix and match different items.

I tested several coats and pants to get a gothic, modern vampire vibe. Once I settled on a base outfit, I exported the clothing back to ZBrush to sculpt unique folds and break symmetry — especially at the bottom of the coat to give it a jagged, dramatic feel.


One helpful trick during this stage is using the Edit Mesh tools inside CC5. These tools allow you to make precise tweaks directly on the clothing or body mesh — ideal for resolving minor overlaps, adjusting silhouettes, or even fixing mesh clipping and light skinning issues. They're especially useful when parts of the outfit intersect with the body during movement or when you need to make manual adjustments to avoid mesh clashing in animation. You can sculpt mesh regions, move vertices, and fix problem areas without having to re-export to ZBrush, which is a huge time-saver.

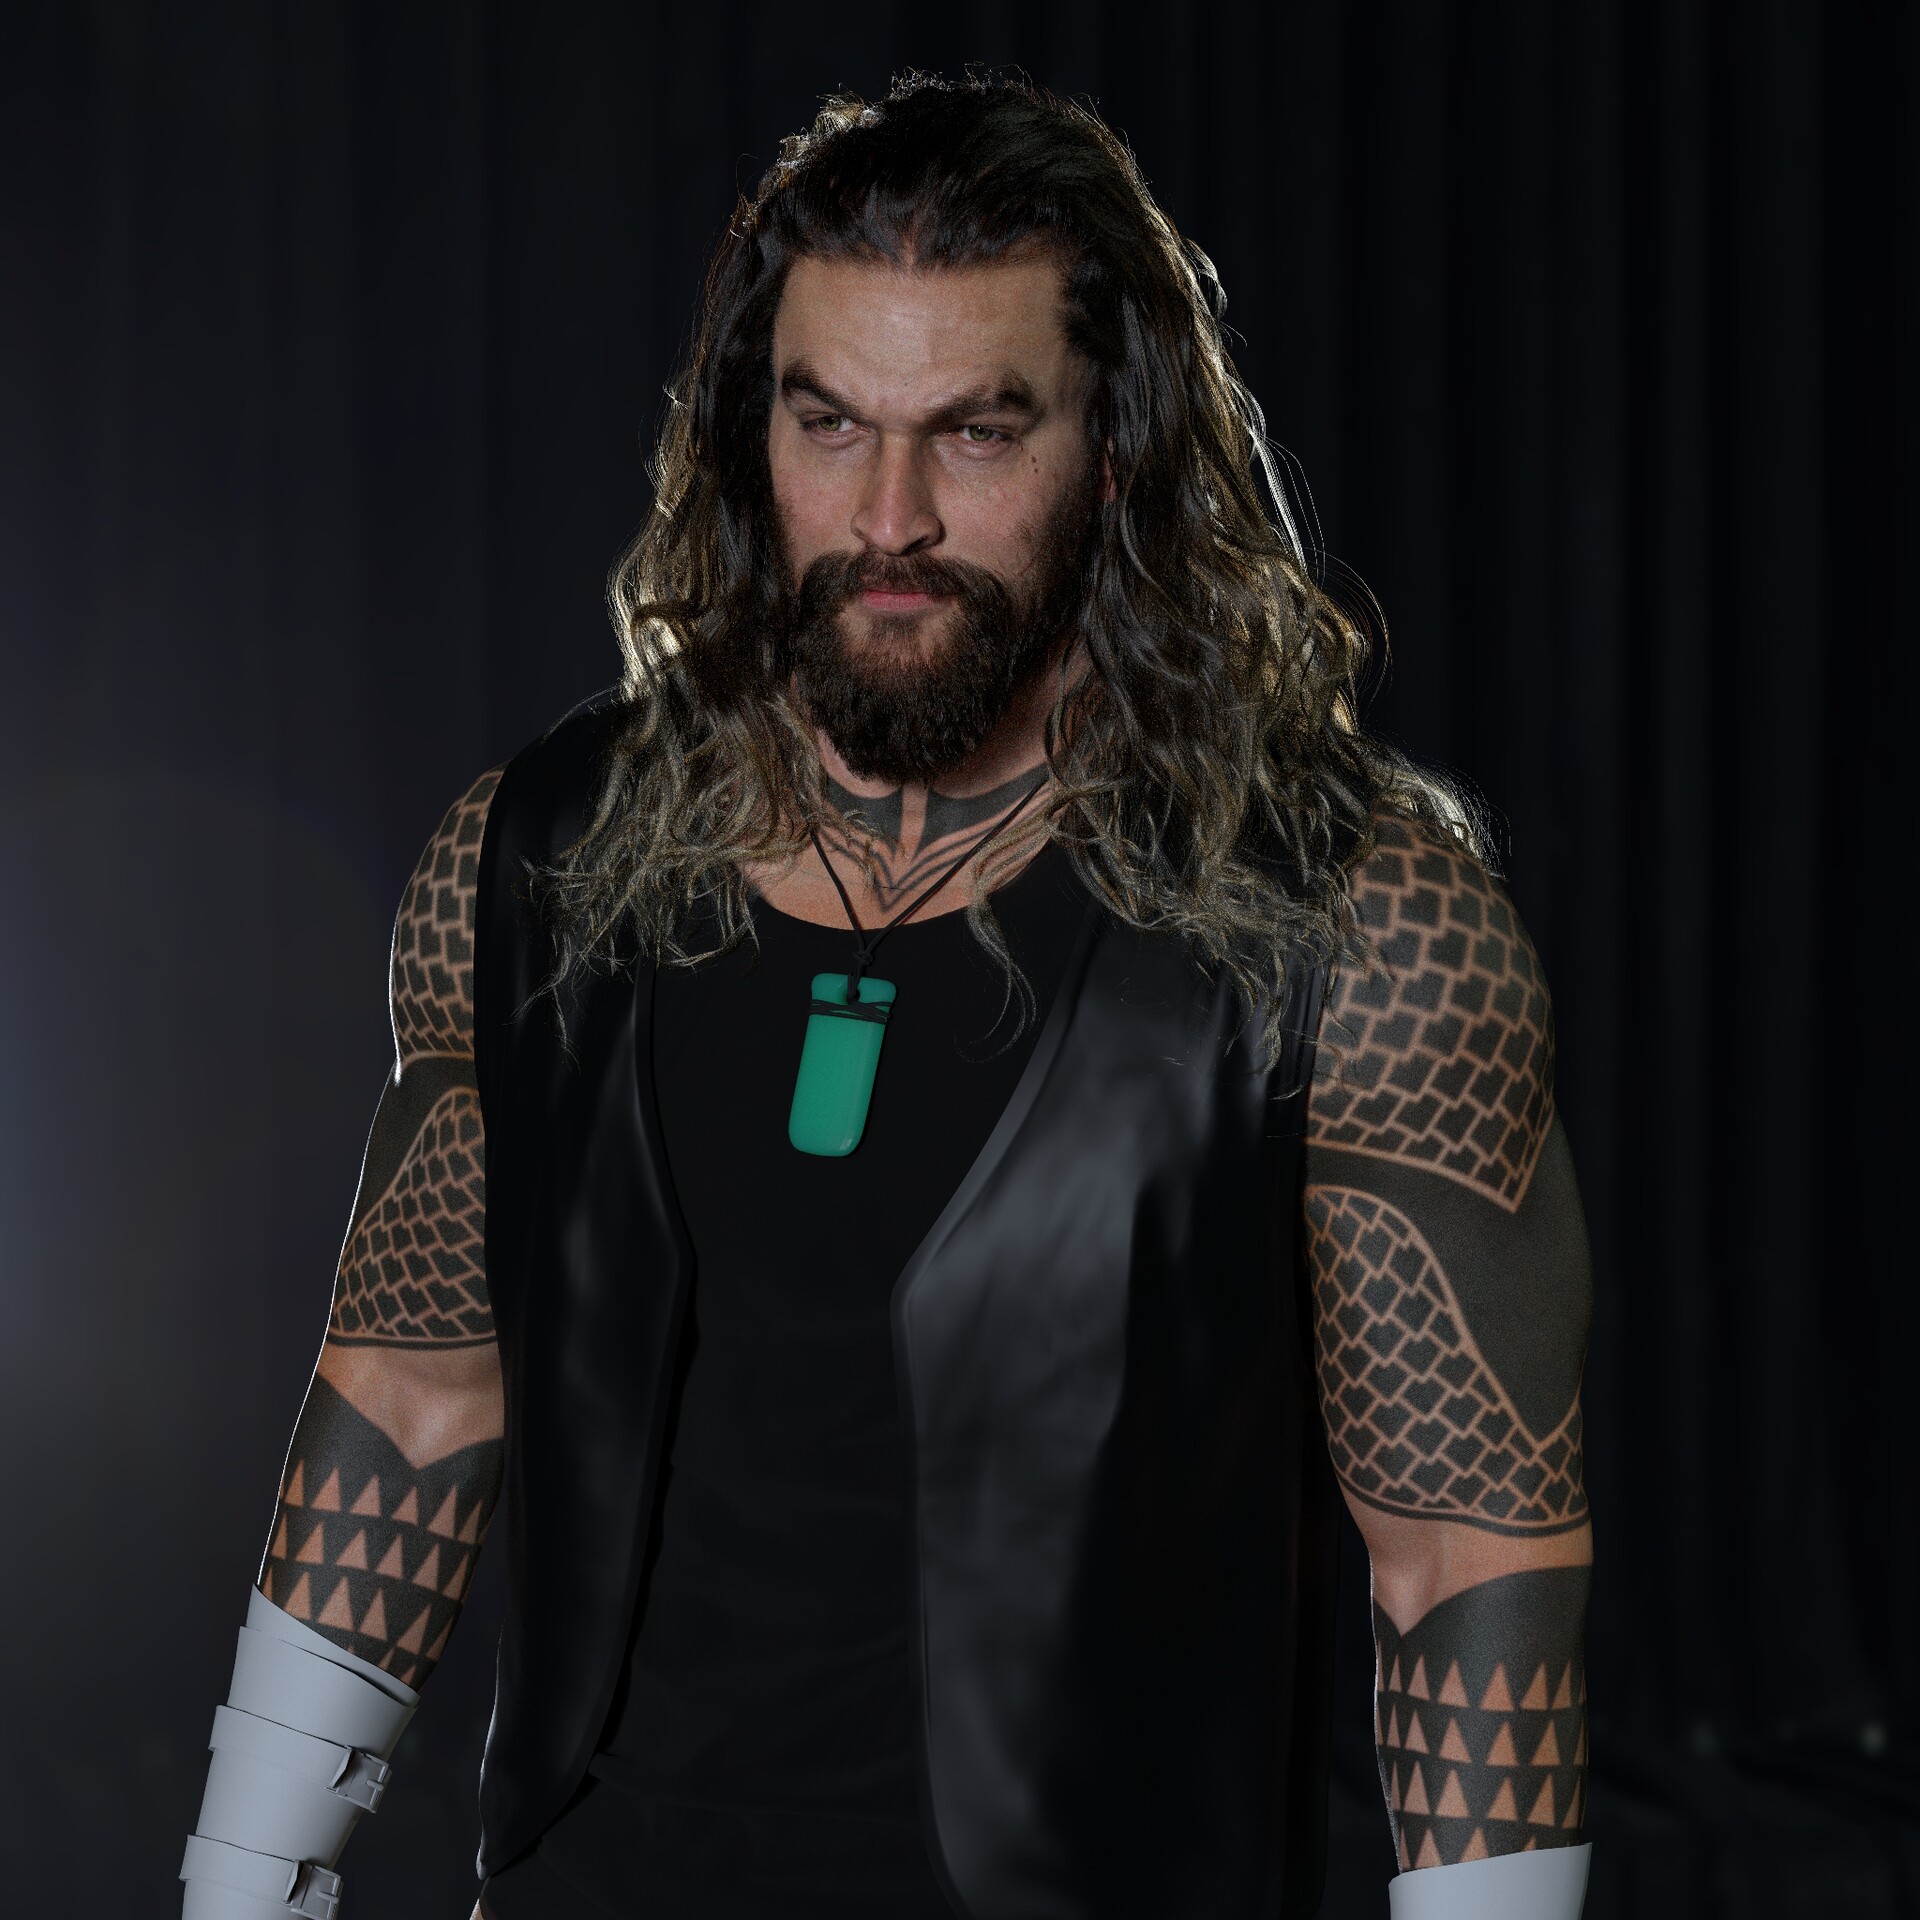
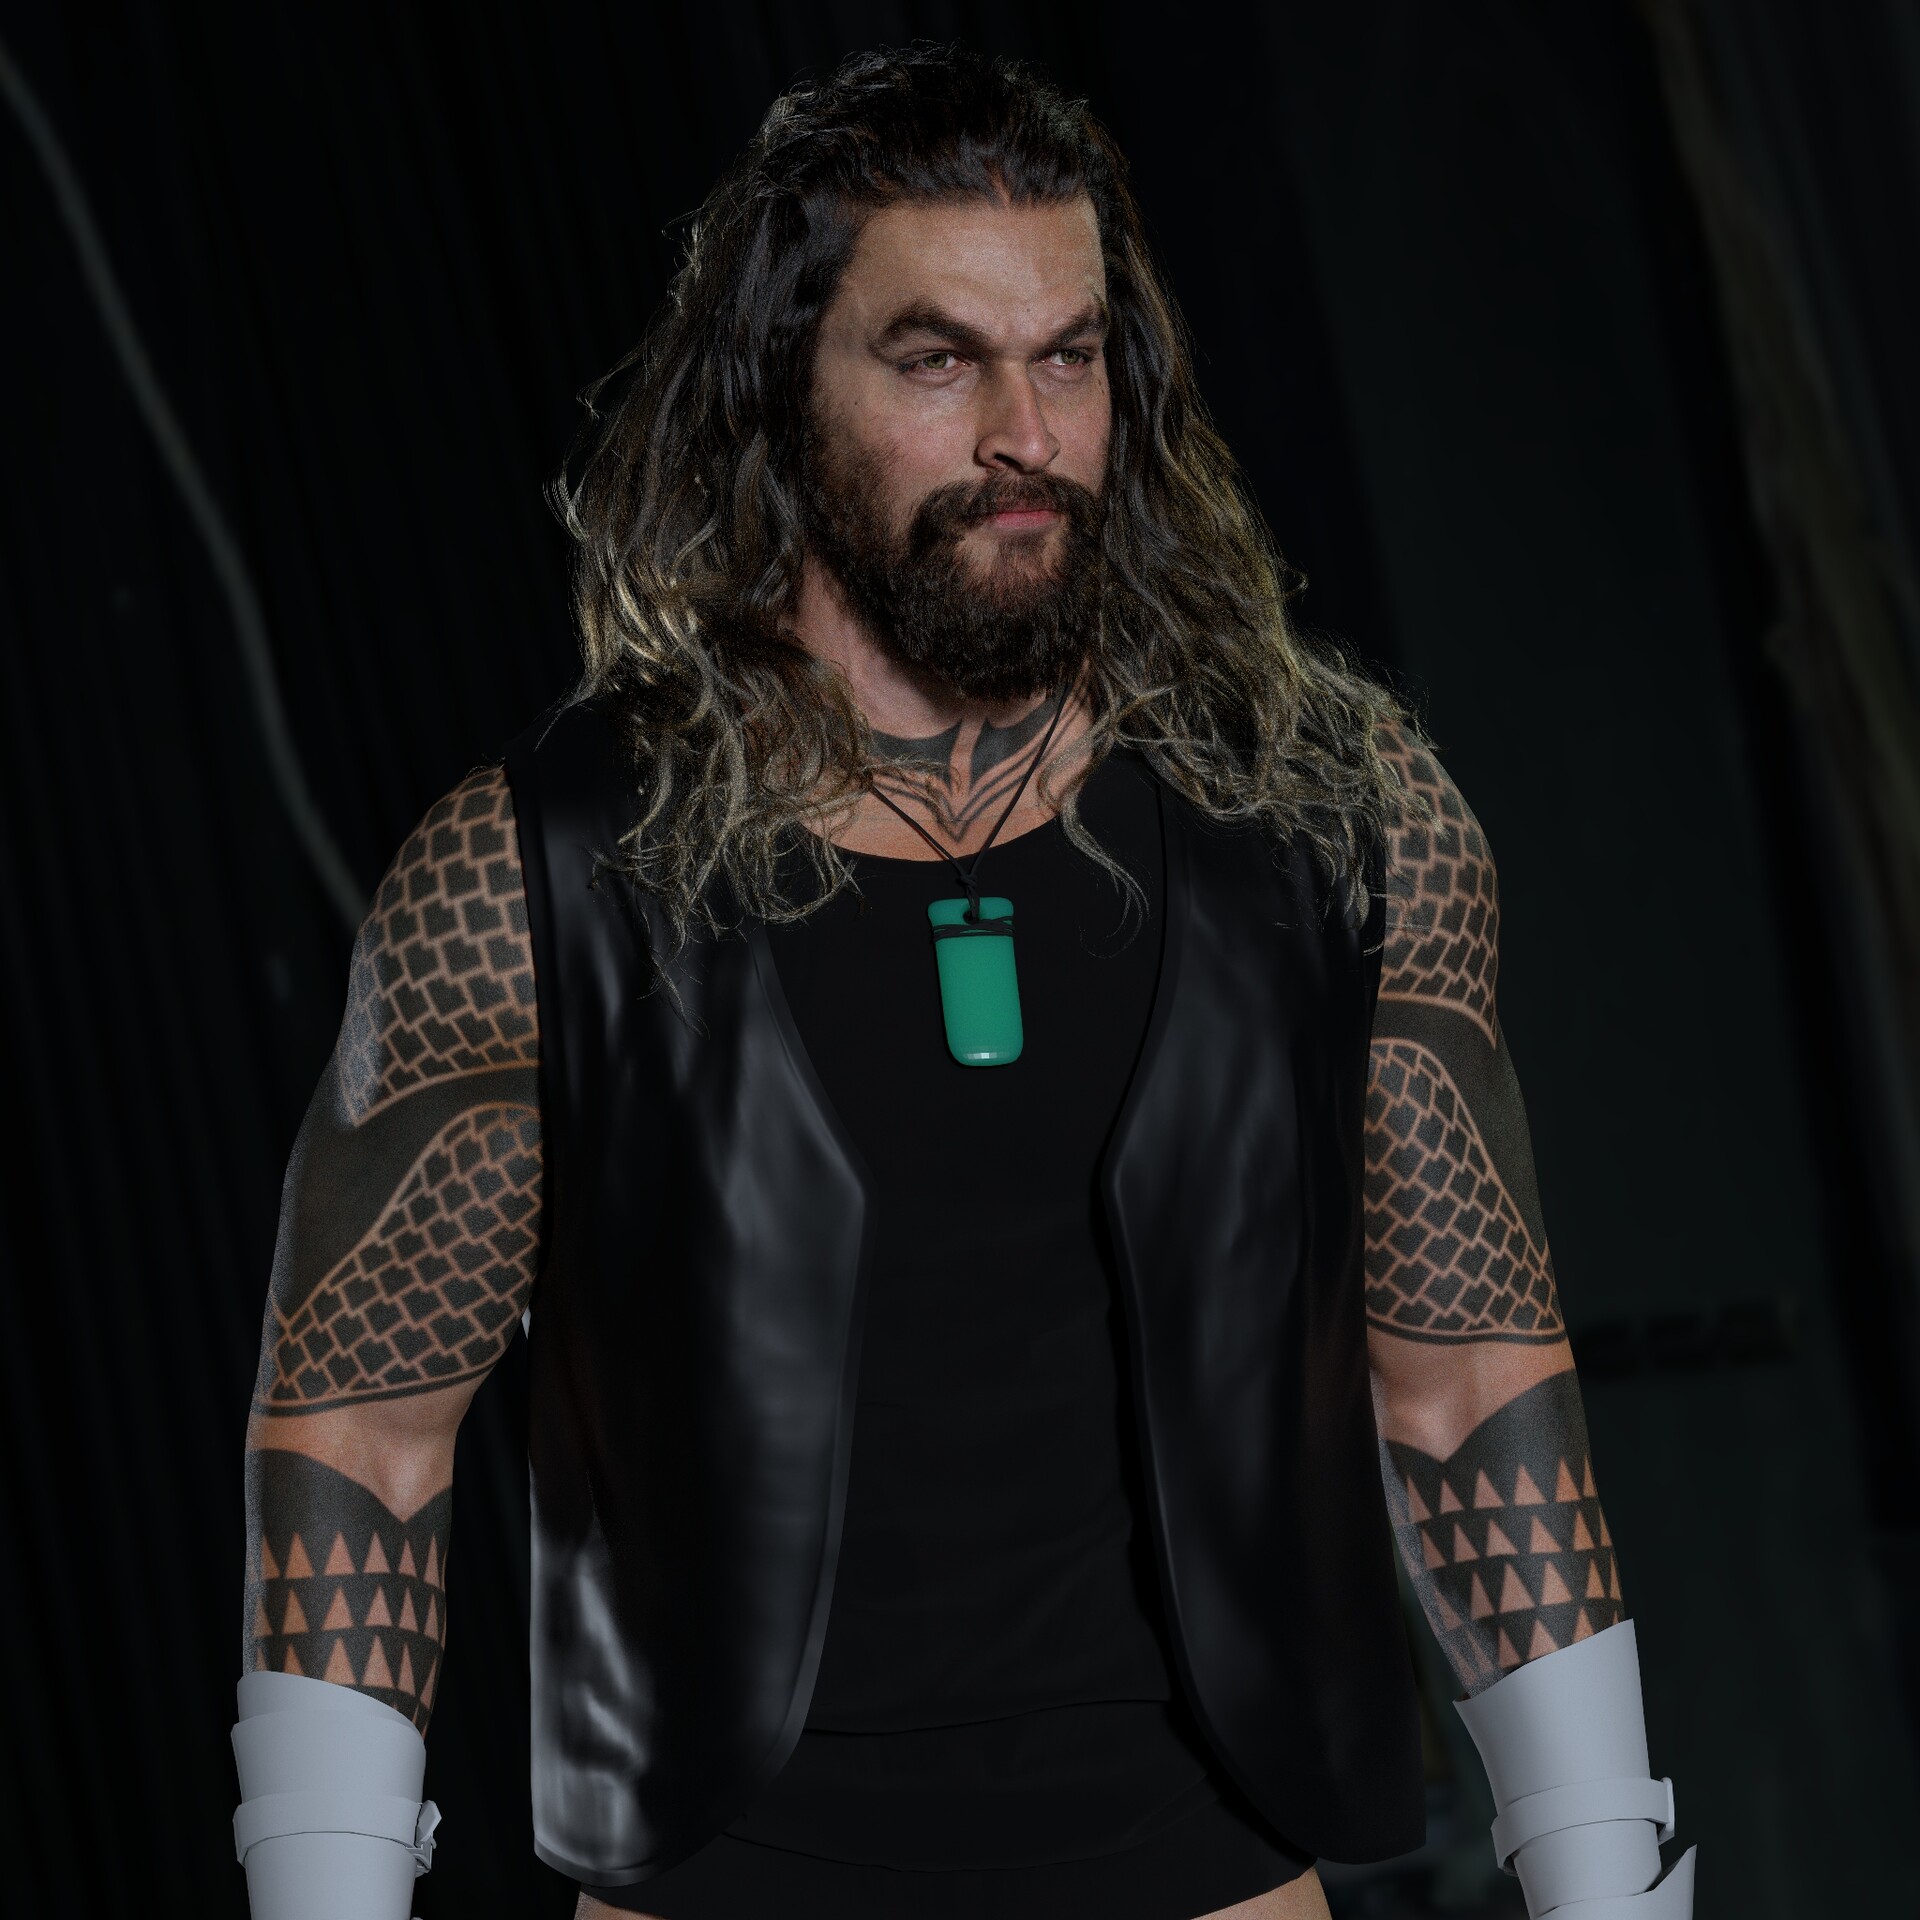
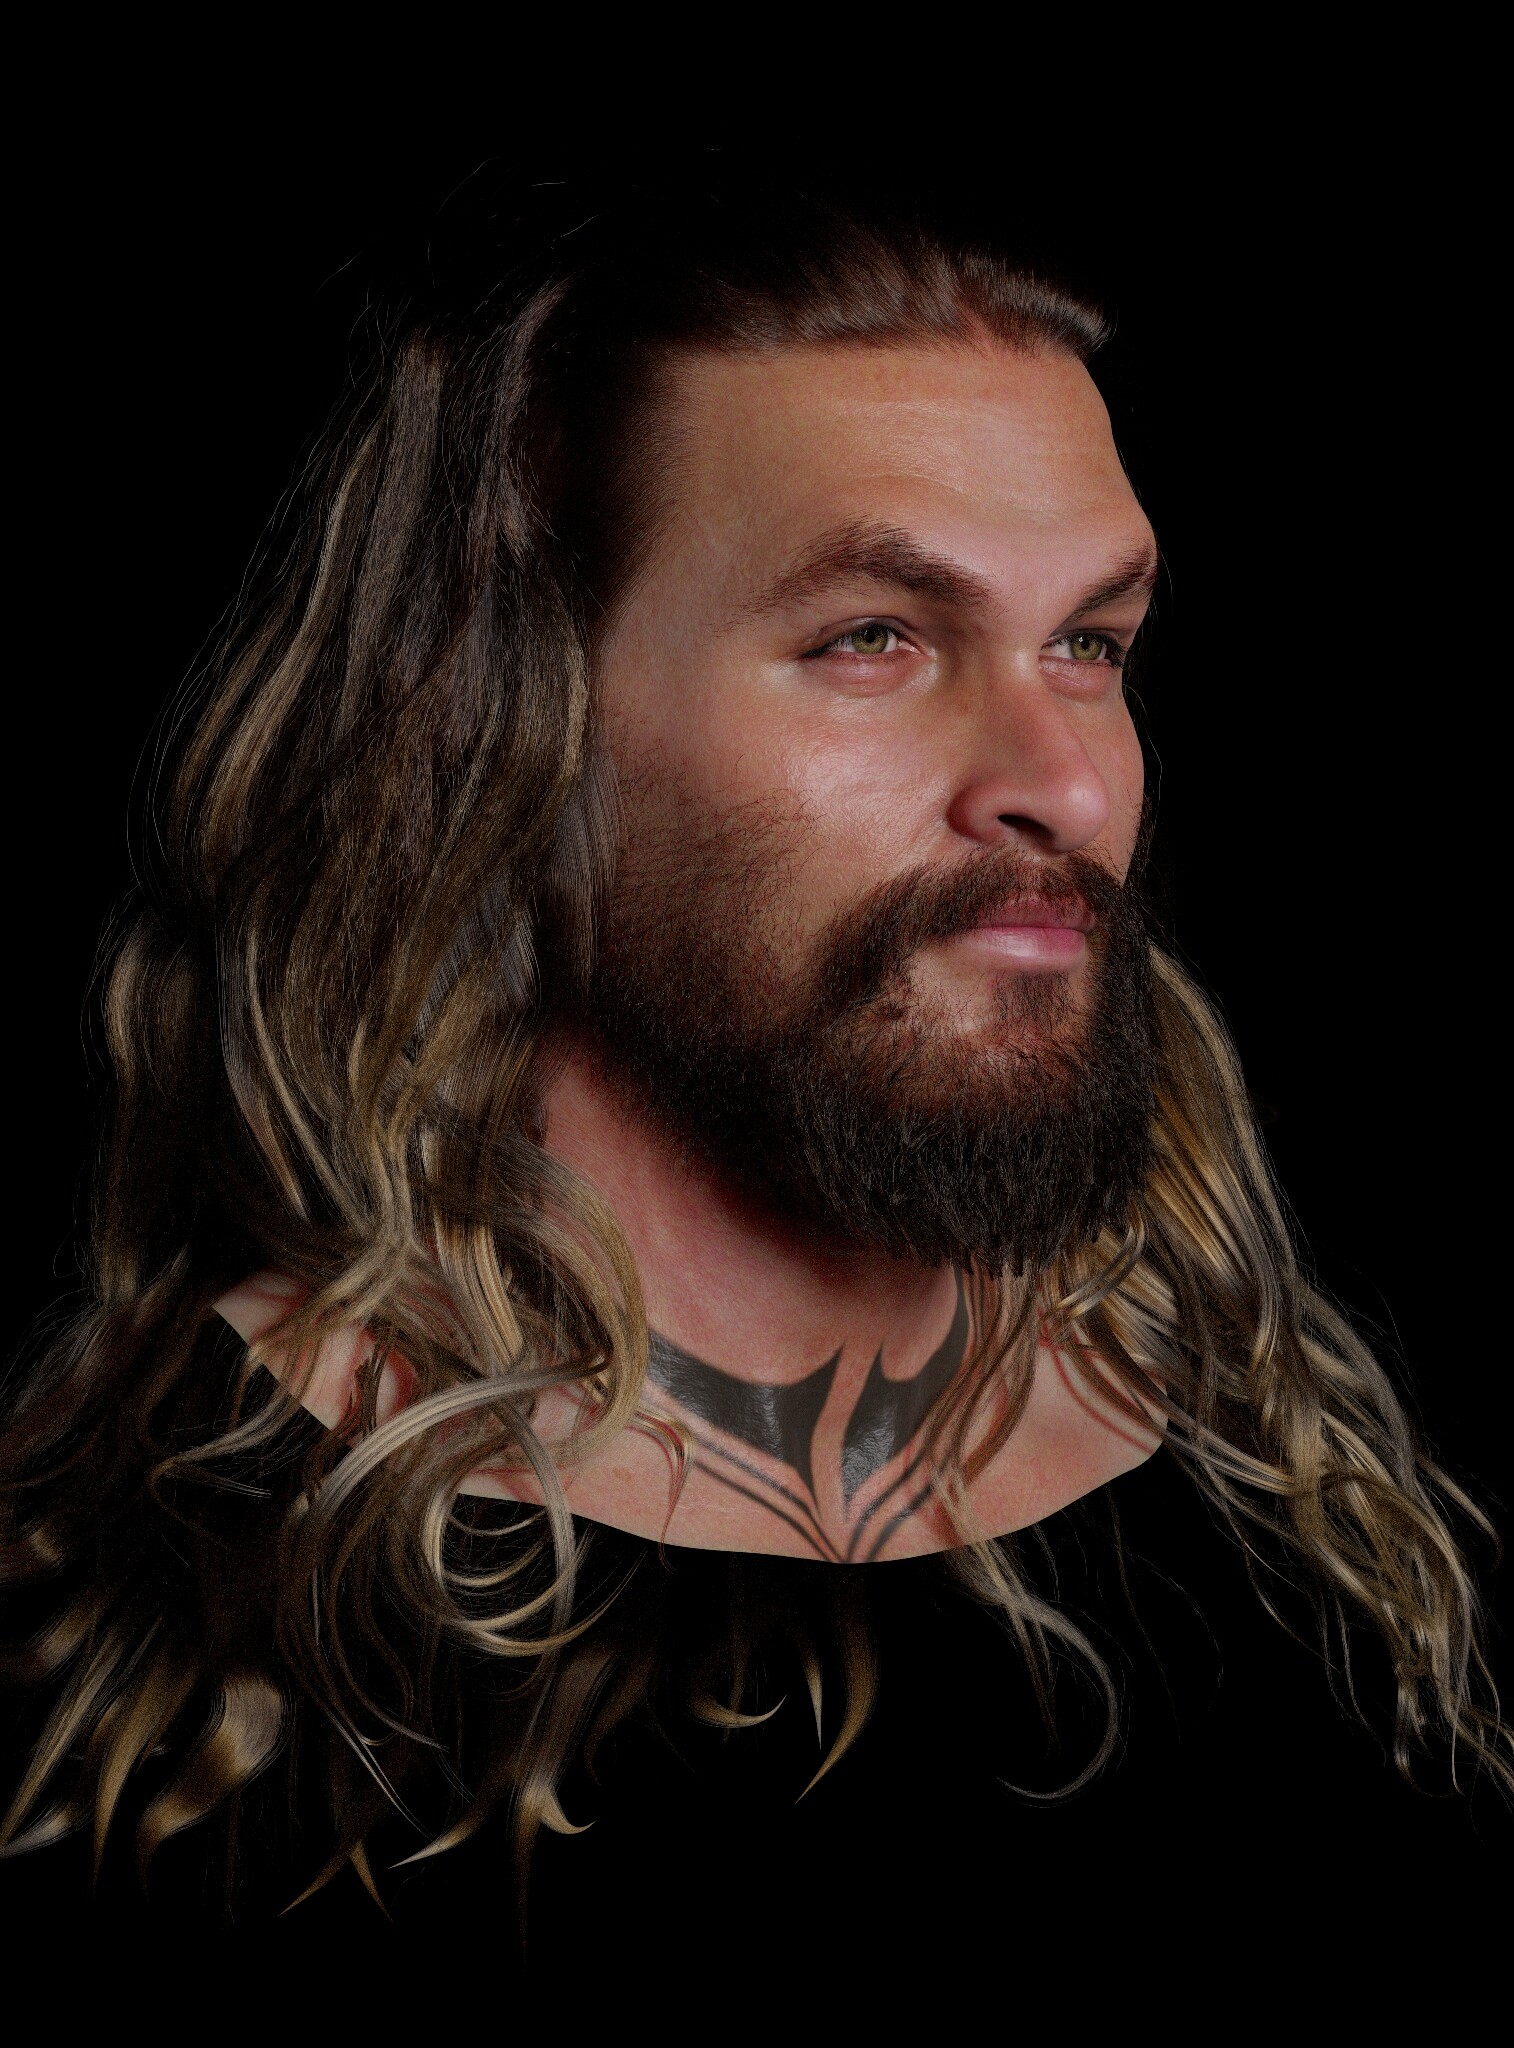
4. Grooming Hair in XGen (Maya)

For the hair, I wanted something stylized but rooted in realism. I used XGen Interactive Groom in Maya to create both the hair and brows.

Once done, I exported the grooms as Alembic caches. These were imported into Unreal Engine and bound to the head skeletal mesh using the Groom component. Rotation and scale adjustments were needed during import (Rotation X = 90, Scale Y = -1) to match orientation.

You can also watch the full process for the hair here:How to Create Metahuman Hair in XGEN and Unreal Engine Tutorial


5. Setting Up in Unreal Engine 5.7

I imported the CC5 character FBX with Morph Targets enabled to preserve facial blend shapes. Then I used the Create CC Control Rig function to automatically generate a control rig and blueprint compatible with UE5.

One key note: I switched the character to CC5 HD mode before exporting from CC5 to ensure full facial rig compatibility.


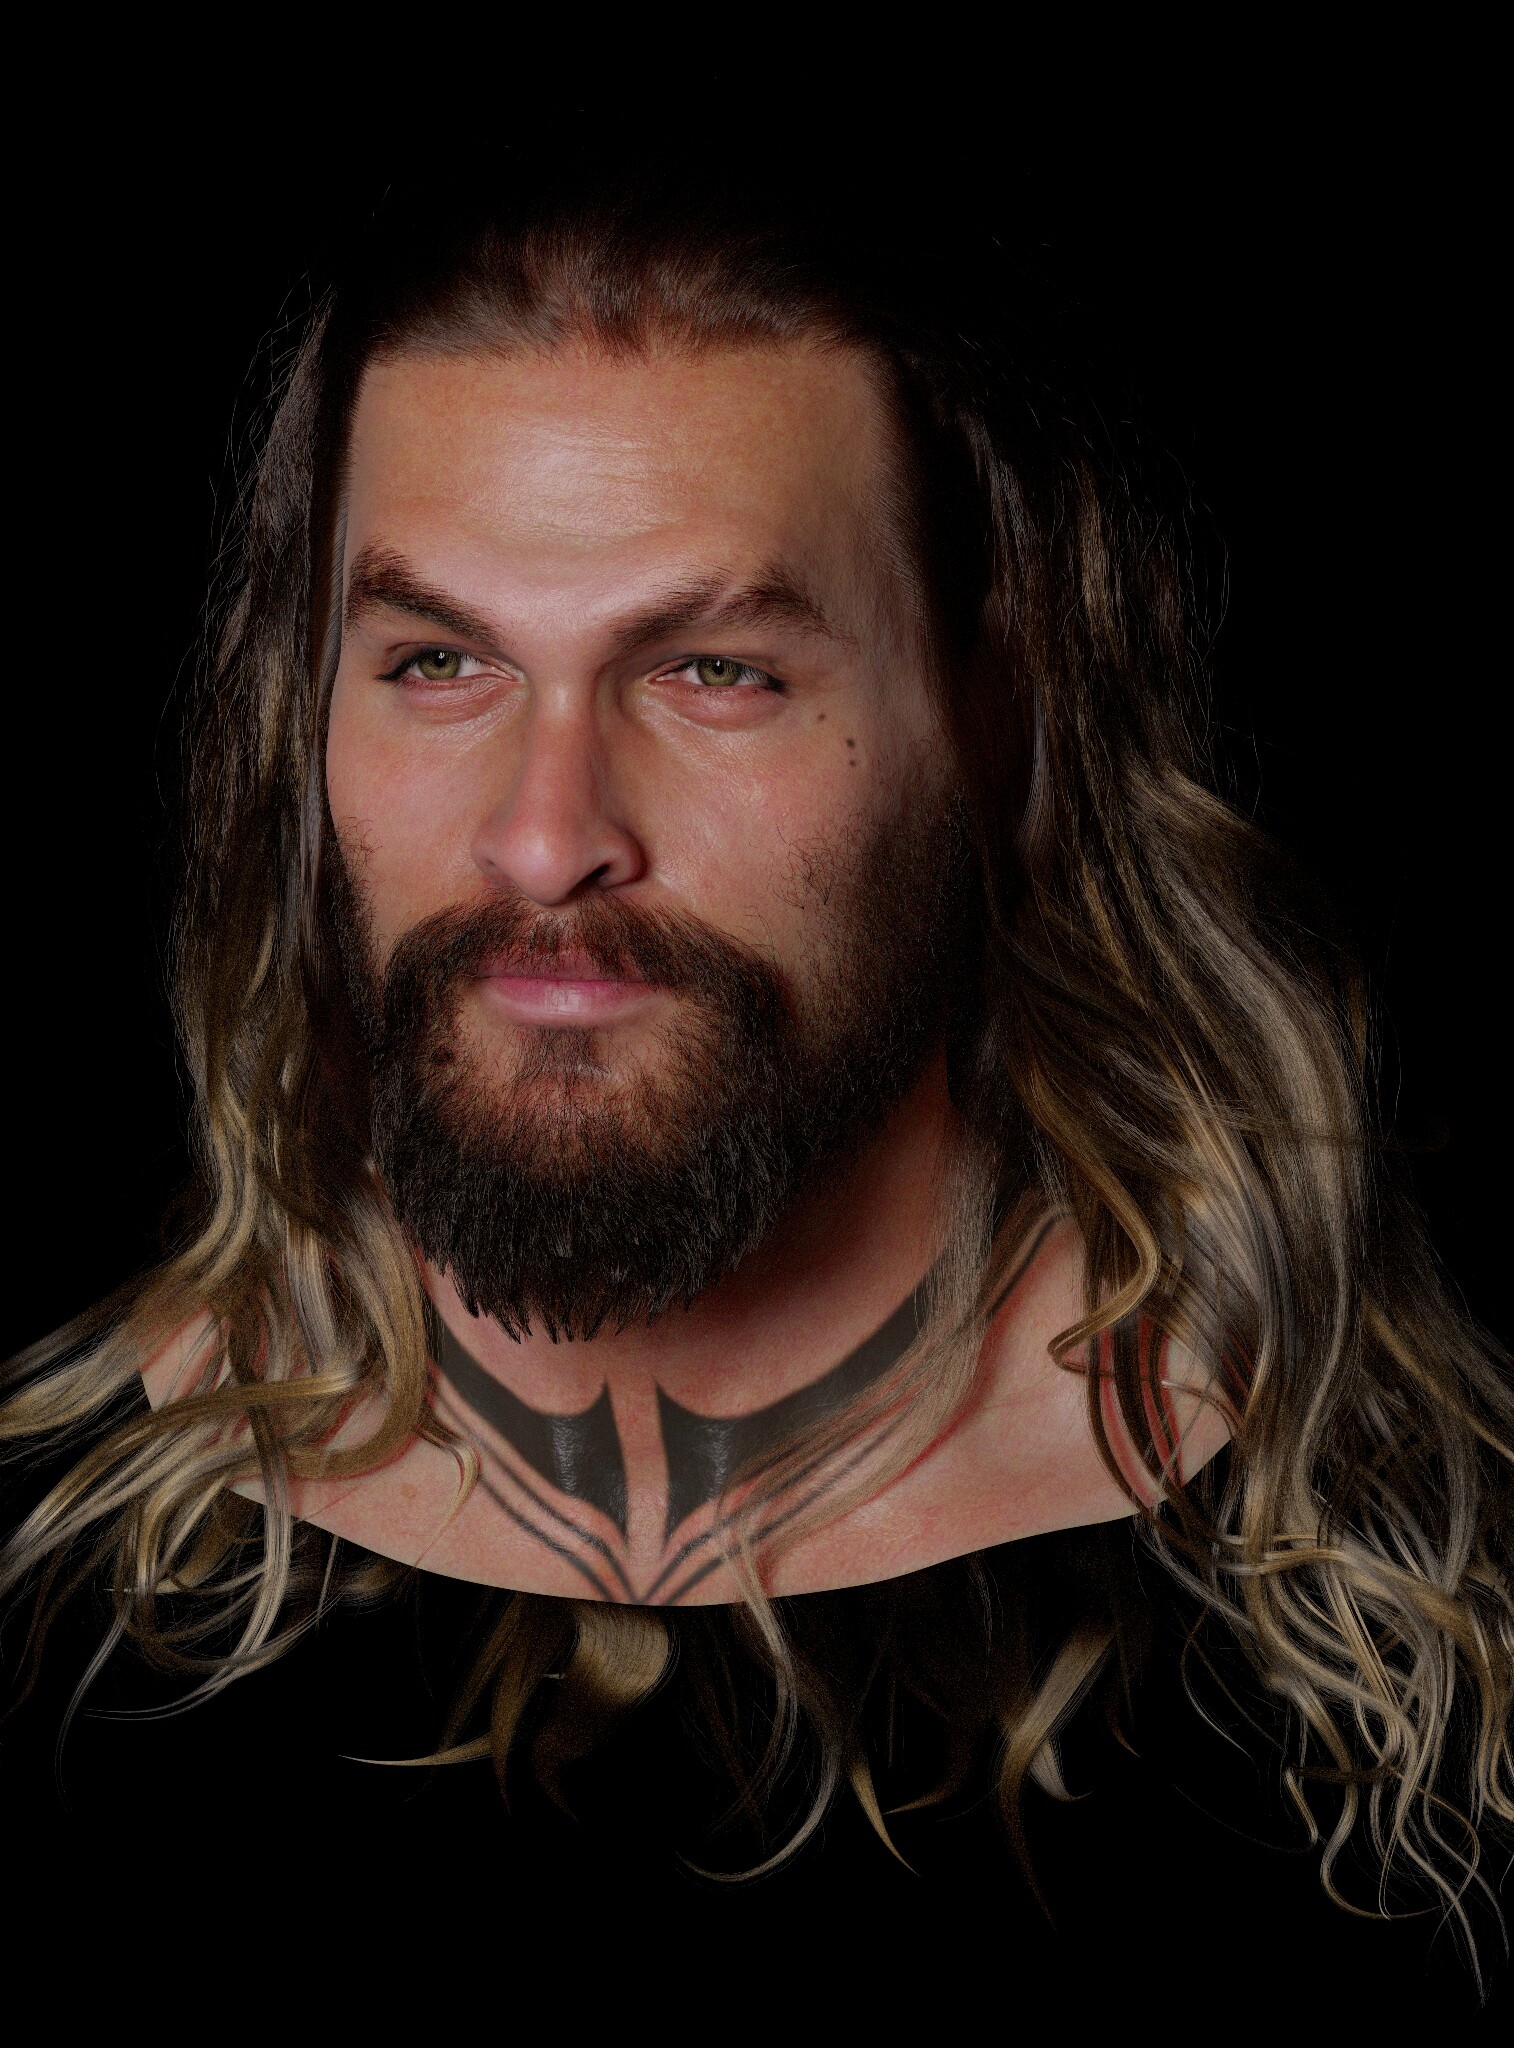
6. Scene Assembly, Lighting, and FX

For lighting, I kept it simple: one spotlight, one point light, and a bit of color grading. To give the environment some energy, I added a Niagara fire effect in the background with a red tint, simulating a burning castle vibe.

This helped frame the character in a more cinematic way and added subtle motion behind the dialogue.


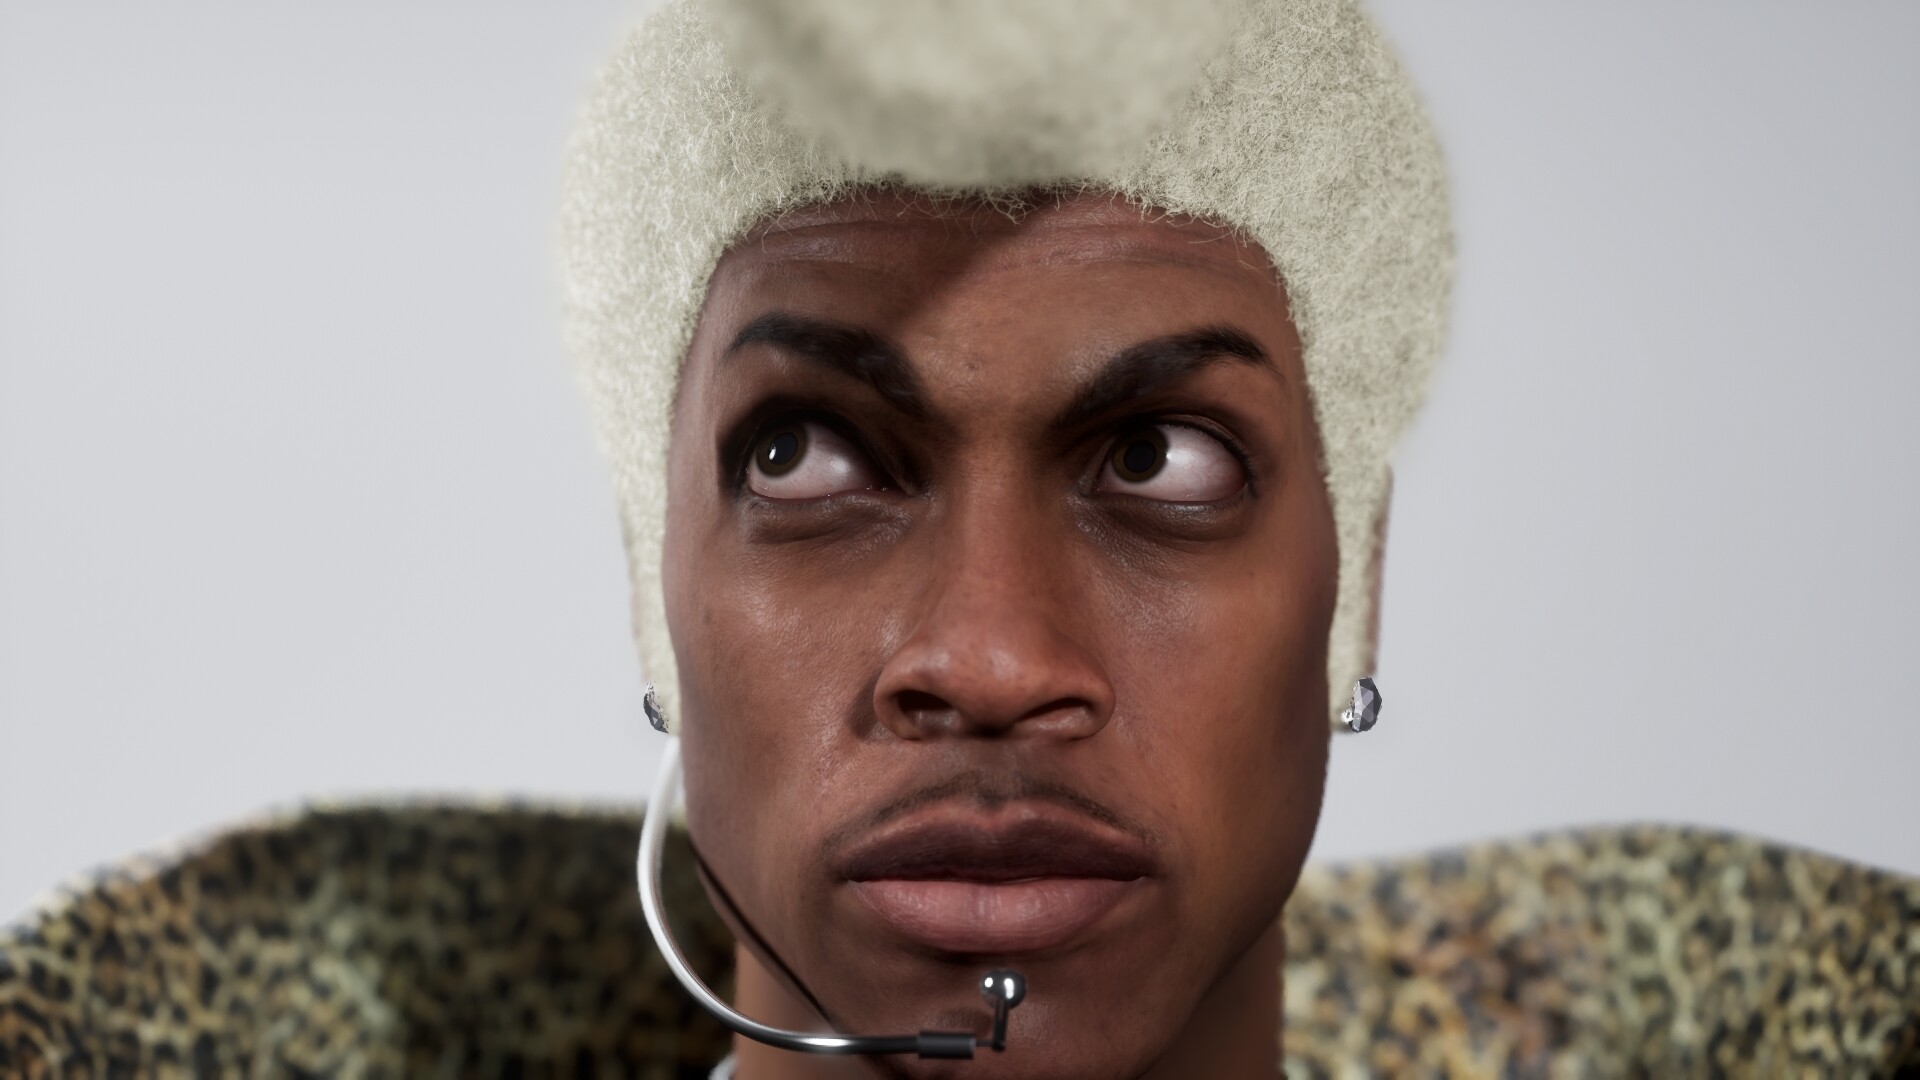
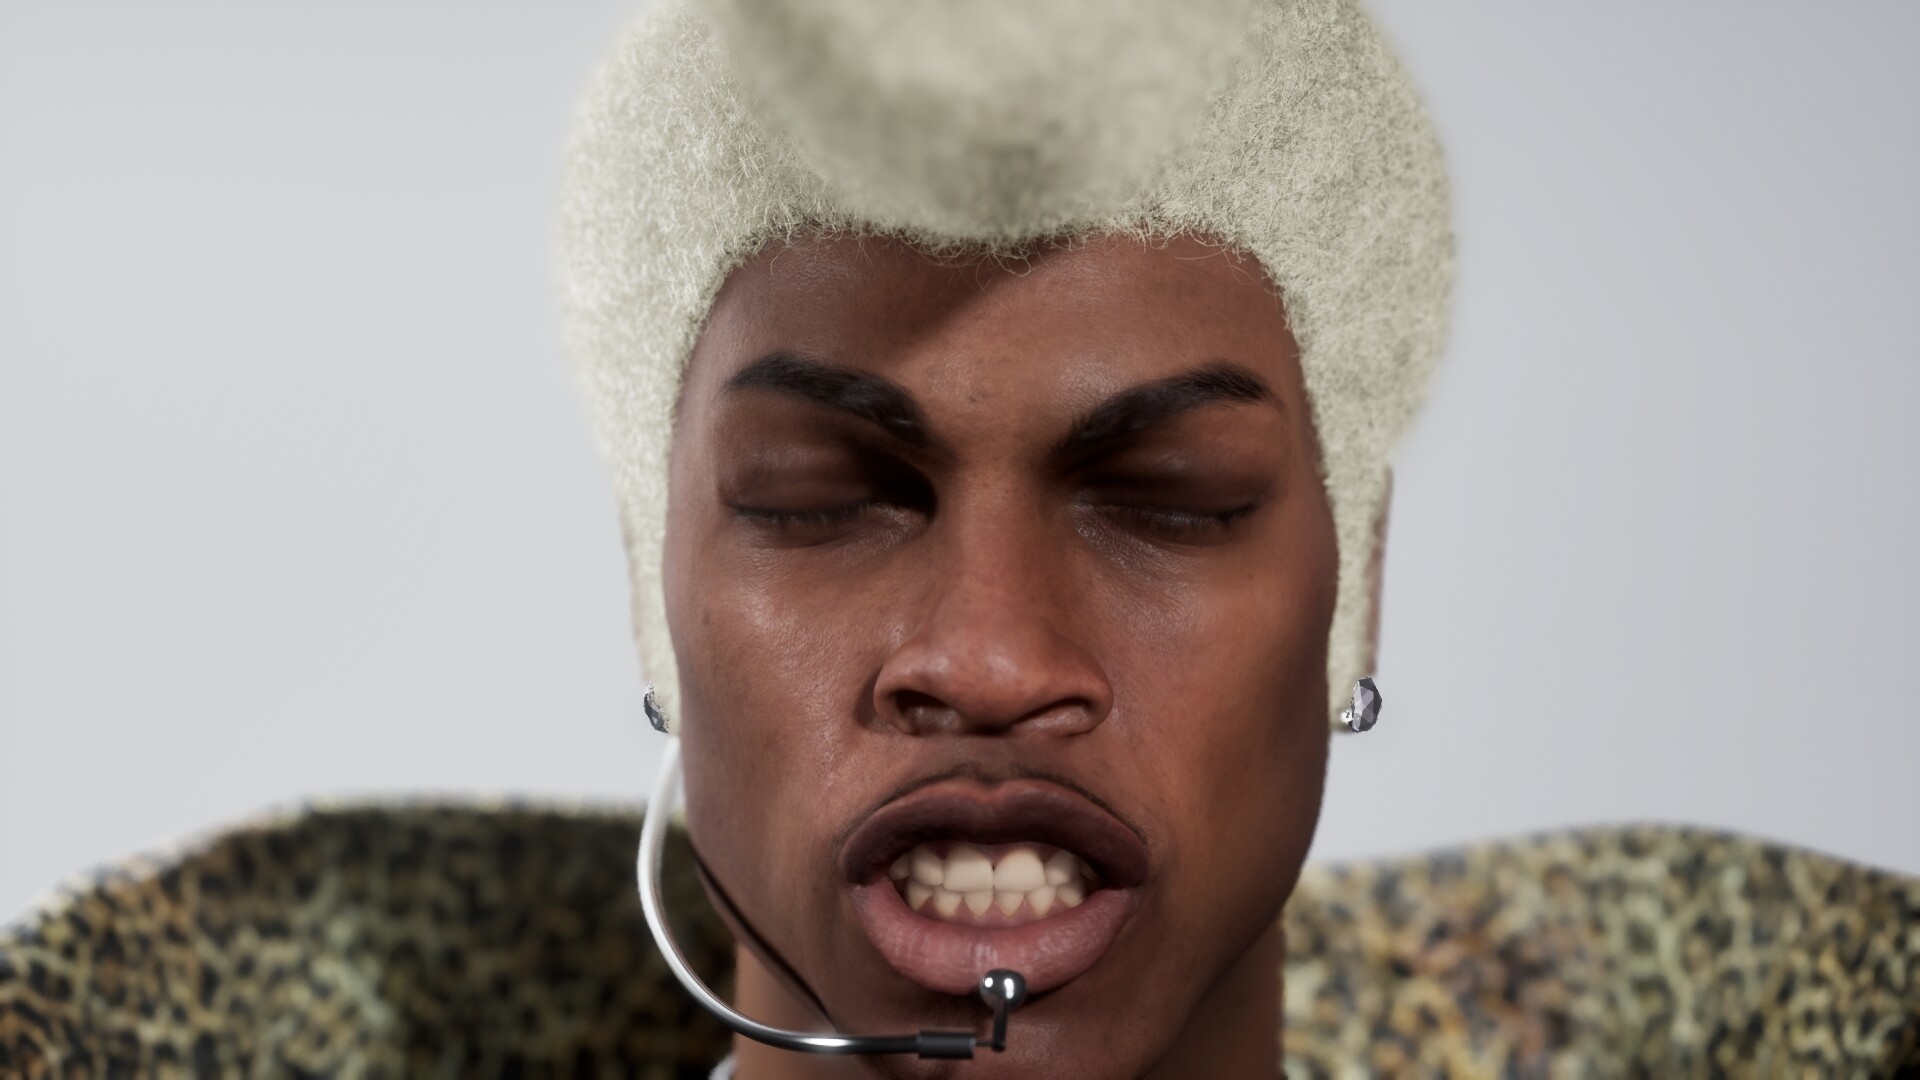
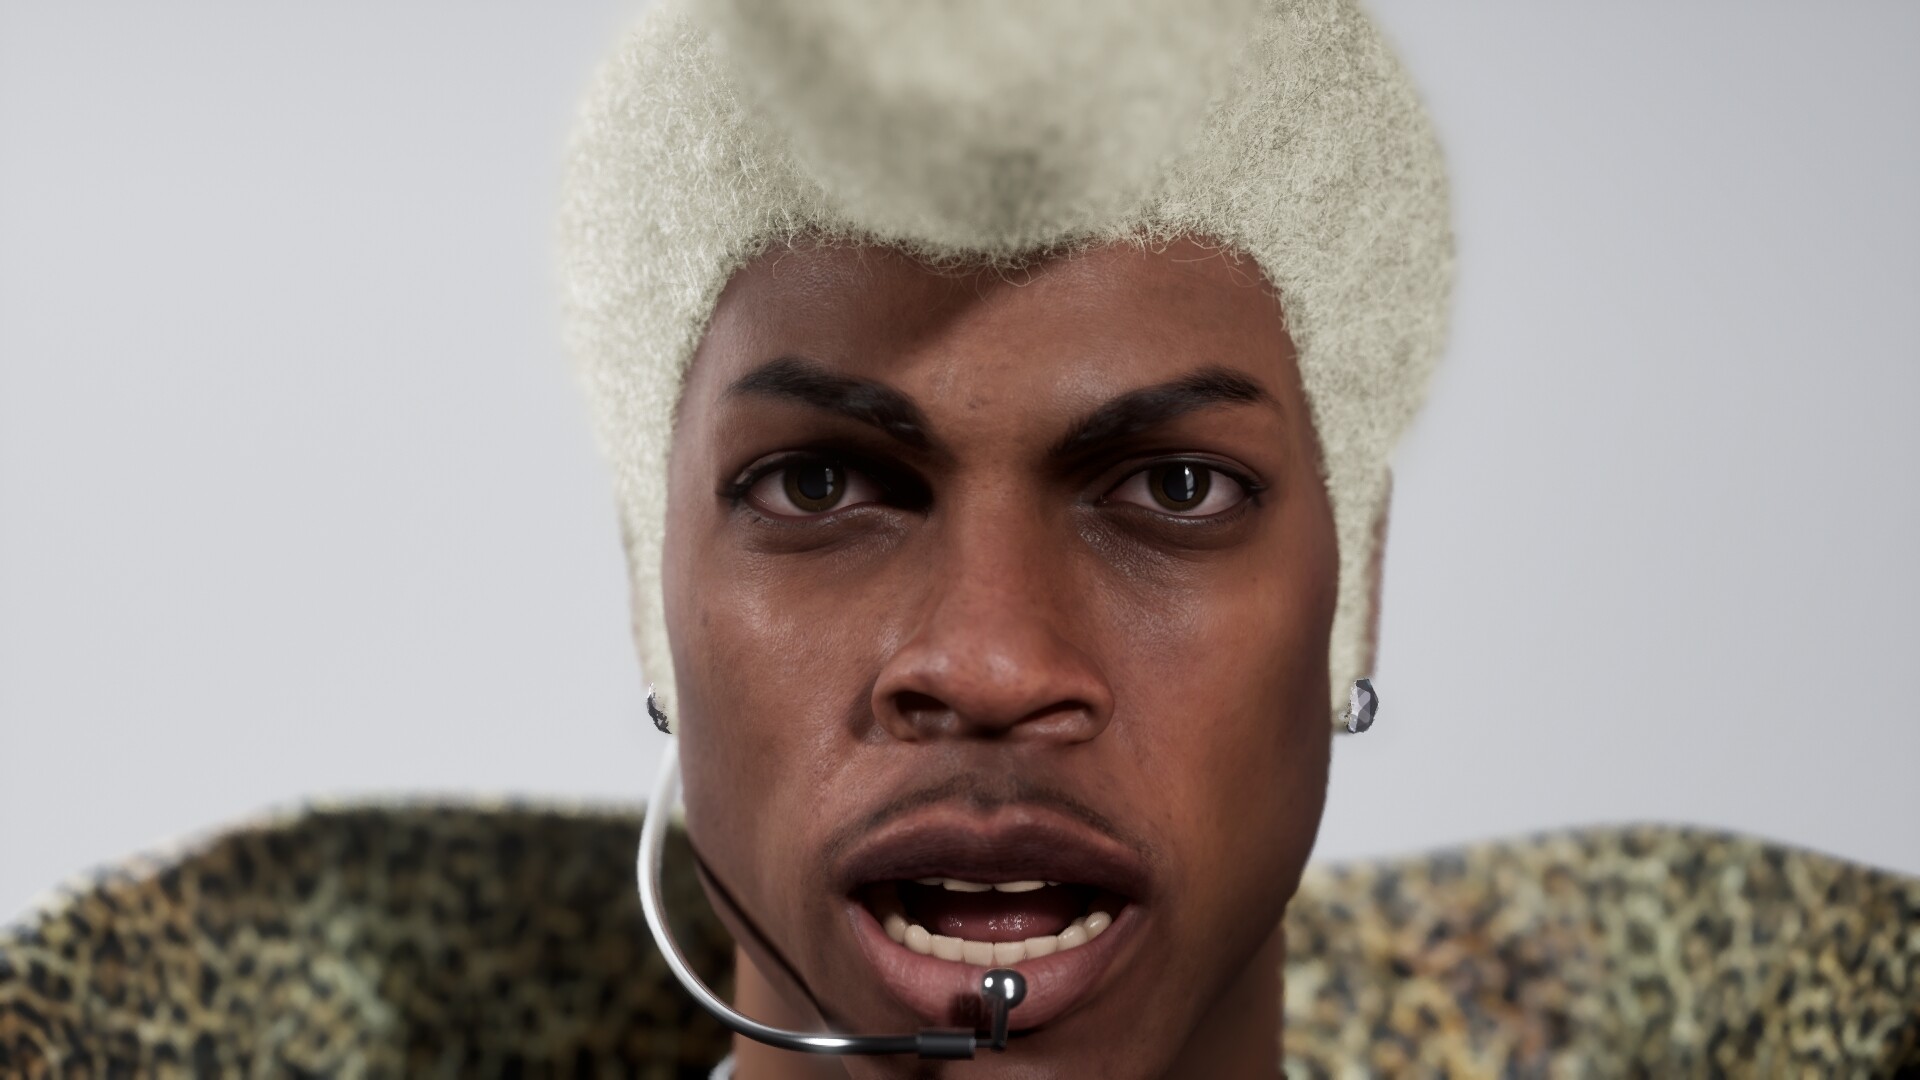
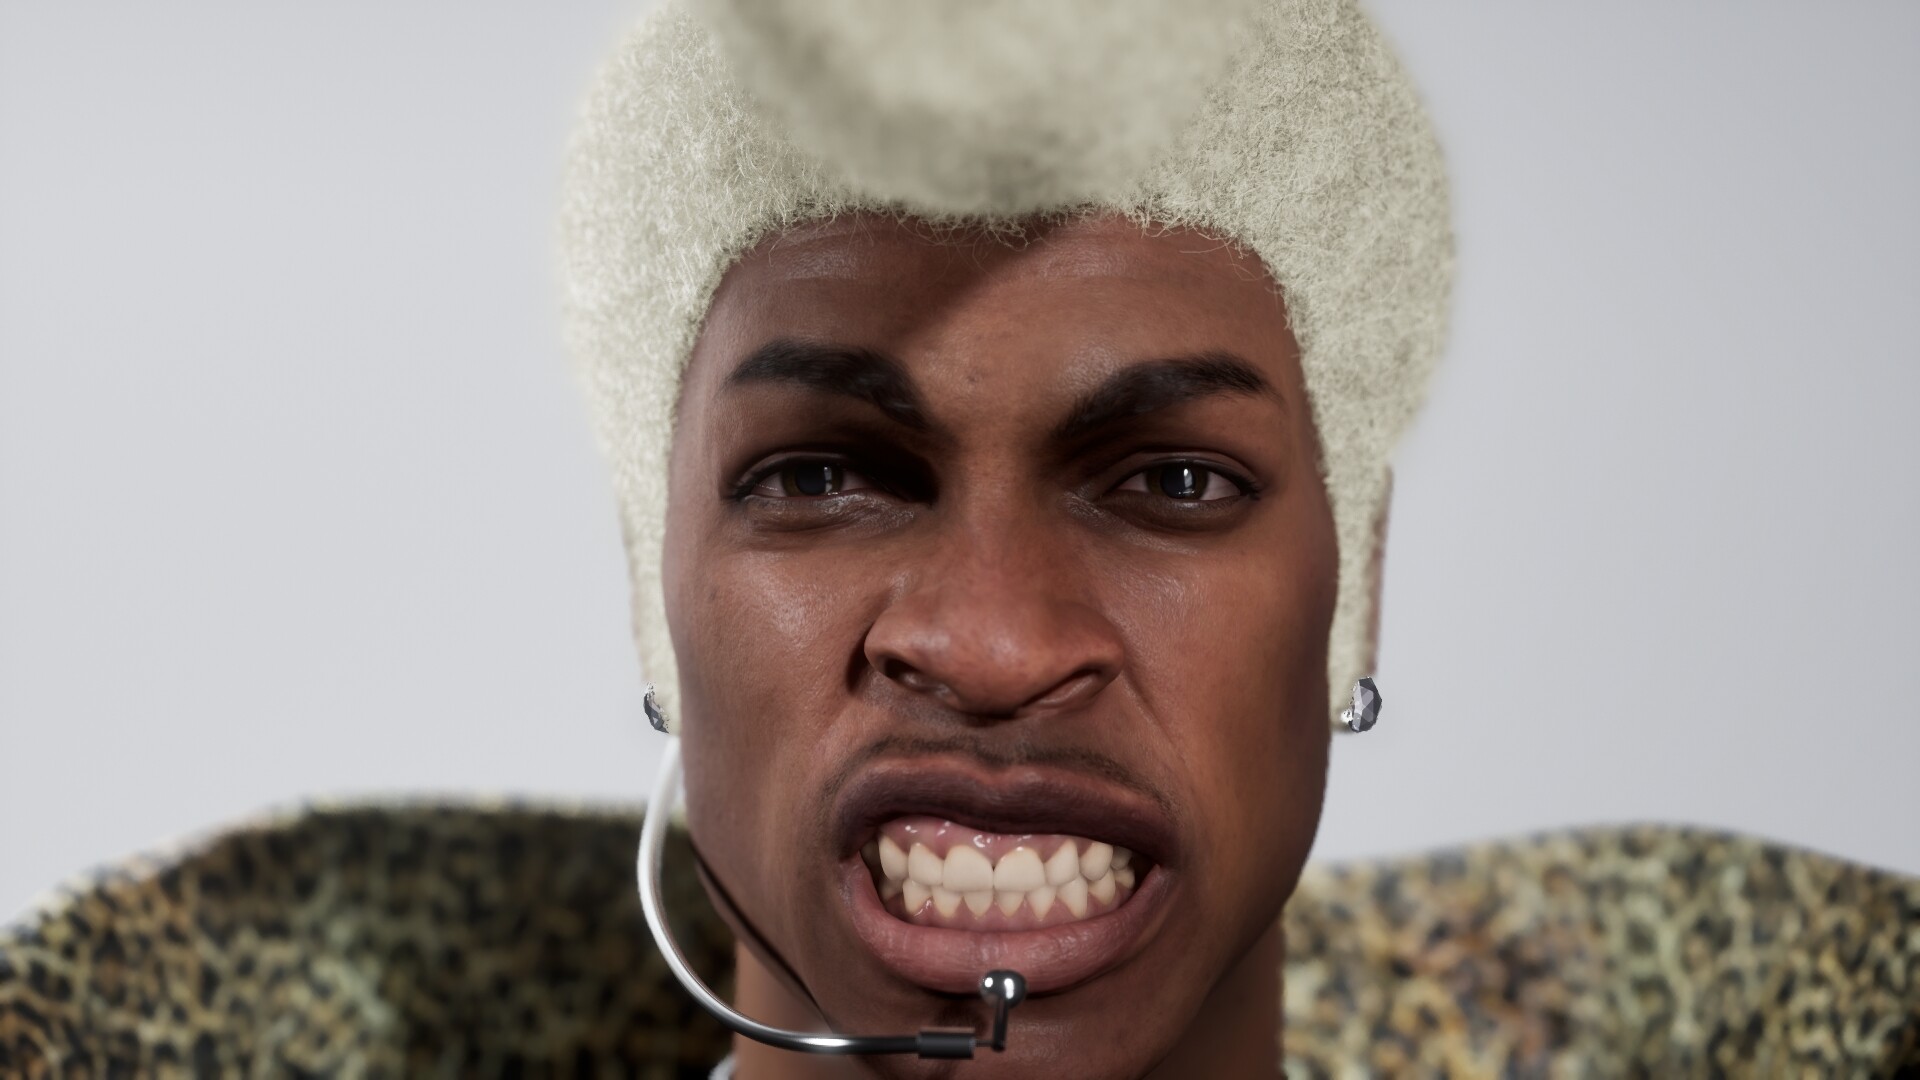
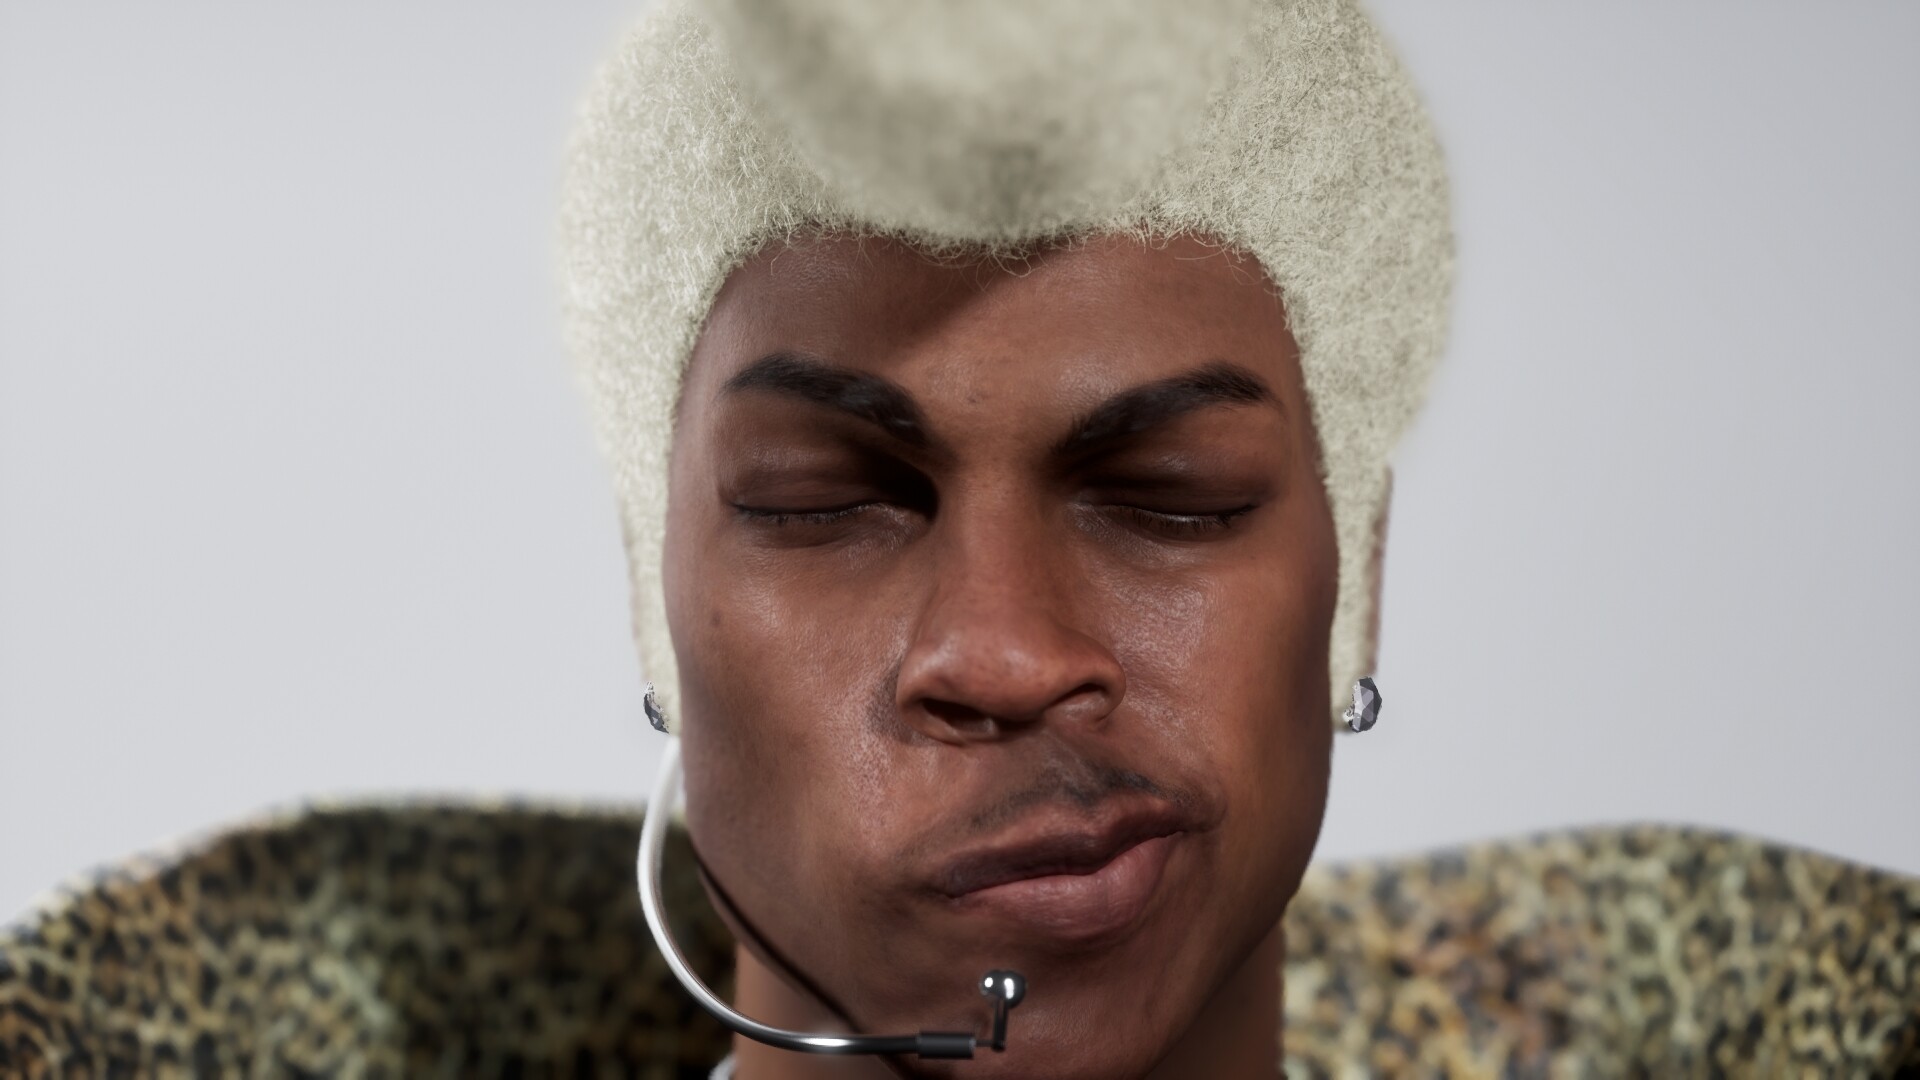
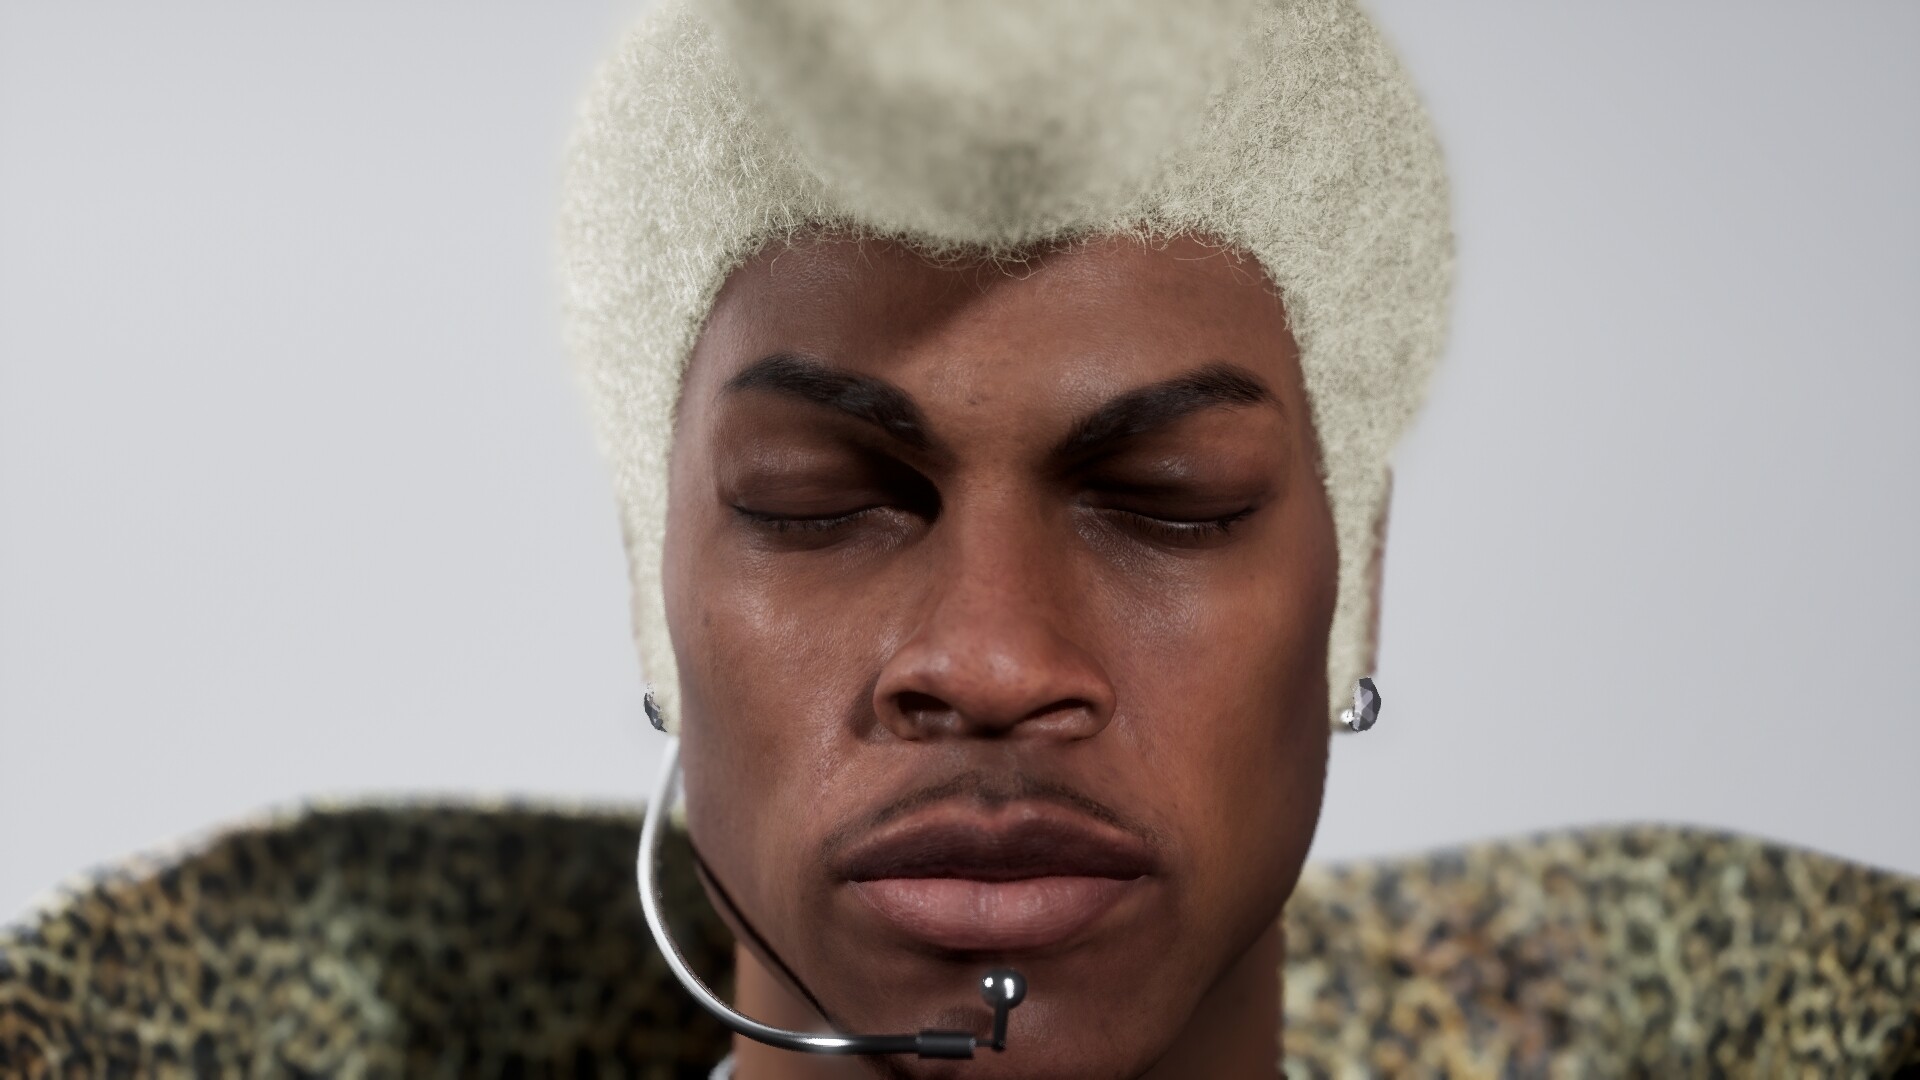
7. Facial Animation and Audio Sync

I recorded myself and exported the audio as a WAV file, which I used as the input for MetaHuman performance capture inside UE5.

Once the animation was generated, I disabled the head movement (to reuse the mocap animation) and combined the facial performance with the body motion.

Later, I ran into an issue with eye movement not tracking properly. The fix was enabling the Control Look At option inside the Control Rig and manually tweaking eye positions frame-by-frame for believability.


8. Solving Mesh Clipping and Skinning Bugs

In UE5, I noticed the coat mesh was intersecting with the body, even though this didn’t happen in CC5.

Using Vertex Sculpt tools inside the Skeletal Mesh Editor, I pushed the coat geometry to resolve the issue directly within Unreal. I also used animation curve editing to loop the walking motion and extend the sequence.


Final Thoughts

This workflow was a great mix of creative sculpting, technical problem solving, and real-time character performance. The CC5 HD features combined with Unreal Engine’s control rig tools gave me flexibility without sacrificing visual quality.

If you're building stylized or semi-realistic characters for games, cinematics, or virtual production, this approach is fast, efficient, and powerful.


FAQ

Can I animate ZBrush characters directly in Character Creator 5?Yes. With CC5’s GoZ Plus bridge, you can transfer your ZBrush sculpts, bake textures automatically, and animate them with body motions, facial expressions, and lip sync.

Do I need to retopologize my ZBrush sculpt before sending it to CC5?No. CC5’s neutral base mesh has clean topology and is animation-ready. You only need to sculpt details and then bake displacement and normal maps for transfer.

How does CC5 handle HD subdivision from ZBrush?CC5 supports adaptive subdivisions. You can send models back and forth at different levels (Lv0, Lv1, Lv2) and automatically generate optimized maps for each.

Can CC5 handle non-human characters sculpted in ZBrush?Yes. CC5 includes tools like Adjust Bones and Pose Offset to fix skeleton alignment, making even stylized or alien proportions fully animatable.

What animation features can I use once the sculpt is in CC5?You can apply motion capture, motion libraries, facial morphs, dynamic wrinkles, and voice-based lip sync to bring your ZBrush characters to life.


📺 Full video breakdown on YouTube: https://youtu.be/7zfJvWg4iqk

🏋🏻‍♀️ My Work:  https://www.instagram.com/mrnunez

 🔗 Brushes & tools available on Gumroad: https://mrnunez.gumroad.com/l/Hair_v2

 📩 Questions or collabs: marlon@mrnunez.com


Report

Would you use a 13-inch tablet for Professional Work?

General / 25 February 2025


Huion Kamvas 13 Gen 3 Review – Can It Handle 3D Sculpting?

When it comes to choosing a display tablet for 3D work, size, resolution, and pen performance all play a huge role. So when I got my hands on the Huion Kamvas 13 Gen 3, I had one big question: Can a budget-friendly, 13-inch tablet handle serious 3D sculpting and texturing?

To find out, I put it through its paces in ZBrush, sculpting Warwick from Arcane. Here’s what worked, what didn’t, and whether this tablet is a good choice for 3D artists.

First Impressions – Compact, Well-Built, and Matte Screen Goodness

Right out of the box, the Kamvas 13 Gen 3 feels well-built for its price. It’s lightweight and compact, making it super portable. The 13.3-inch display runs at 1920x1080 resolution, which is standard for entry-level tablets. It’s also noticeably more vibrant than older models, covering 99% of the sRGB and Rec.709 color gamuts—a plus for anyone doing texture work.

One of the first things I noticed was the matte screen texture. Huion calls this their Canvas Glass technology, and it’s designed to reduce glare and provide a more paper-like feel. I was pleasantly surprised by how nice it felt—just the right amount of friction for a natural drawing experience. I didn’t even need to wear the usual drawing glove.

Setup was easy, too. Calibration was quick, and like most display tablets, you can set up custom profiles for different software, which is useful when switching between sculpting, texturing, and painting.

Sculpting Test – How Does It Handle in ZBrush?

For this test, I sculpted Warwick from Arcane, which meant a lot of fine detailing—fur, scars, and mechanical elements. Here’s where things got interesting.

Pen Performance – Surprisingly Good

Huion’s latest PenTech 4.0 technology delivers a battery-free pen with three customizable side buttons and a dust-proof grip. It felt smooth, precise, and responsive, with no noticeable lag. Pressure sensitivity worked well, especially for organic sculpting. Compared to my Xencelabs pen, I actually liked the extra third button—it’s small, but having one more shortcut is always helpful.

Screen Resolution – 1080p Feels Tight for Sculpting

This is where I ran into some issues. 1920x1080 on a 13-inch screen sounds fine on paper, but in reality, I found myself constantly zooming in and out to see details properly. For sculpting in ZBrush, especially when working on fine textures, I really missed having 4K resolution. If you’re used to working on a higher-res screen, this will be noticeable.

Tablet Size – A Bit Cramped for 3D Work

The 13.3-inch display might work well for 2D artists, but for sculpting, it felt too small. I had to constantly adjust my workspace to see everything clearly, which slowed down my workflow. If this tablet were touchscreen, I could justify the smaller size, but without that feature, it’s just not ideal for sculpting.

Shortcuts and Dial Controllers – Not Enough for 3D

The Kamvas 13 comes with two dial controllers and five press keys, all customizable. These work great for 2D workflows, but for 3D? Not as much. As a sculptor, I rely on a ton of shortcuts, and five buttons just aren’t enough. I ended up ignoring them and sticking with my keyboard instead.

The radial menu built into the pen is a nice feature—it gives you six quick shortcuts—but I found it a bit limited. Ideally, it would allow for more than six commands and let you rename them instead of just assigning shortcuts.

Final Verdict – Who Is This Tablet For?

The Huion Kamvas 13 Gen 3 is a solid display tablet, but is it good for 3D artists? Here’s the breakdown:

Who Should Consider It?

✅ Beginners on a budget – If you’re just starting with digital sculpting and need an affordable tablet, this is a great option.✅ Artists who need a portable setup – If you travel or work on the go, the compact size is a plus.✅ 2D artists and texture painters – The vibrant colors and matte screen make it a strong choice for 2D work and texture painting.

Who Should Look Elsewhere?

❌ Serious 3D artists – The 1080p resolution and small screen make detailed sculpting harder. If you work with high-res assets, consider a larger or 4K display.❌ Artists who need a touchscreen – If you like to rotate, pinch, and zoom directly on the screen, this isn’t the tablet for you.❌ Shortcut-heavy workflows – The limited buttons and radial menu aren’t enough for complex 3D workflows.

Final Thoughts

At $250, the Huion Kamvas 13 Gen 3 is a good entry-level option for digital artists, especially for 2D work and texture painting. However, for 3D sculpting, the low resolution, small size, and lack of touchscreen make it a bit frustrating.

Would I use this as my daily 3D sculpting tablet? No. But if you’re a beginner, working on a budget, or need a portable second screen for sculpting and texturing on the go, it could be a worthwhile option.

Let me know—would you use a 13-inch tablet for 3D work? Or do you need a bigger screen to stay productive?

Report

Creating Realistic Skin in ZBrush: A Detailed Guide

General / 27 August 2024

When it comes to bringing 3D characters to life, nothing captures the viewer’s attention quite like realistic skin. Achieving that lifelike texture and detail is a blend of art and technical skill, especially in a tool as powerful as ZBrush. In this article, I’ll walk you through my process of creating realistic skin for 3D characters, offering tips, techniques, and insights I’ve picked up along the way — valuable knowledge I also share with in ArtHeroes 3D Academy to help the students to refine their own craft.

“Work smarter, not harder — when sculpting details in ZBrush, it’s not about how many hours you spend, but how effectively you use each moment to enhance your model’s realism.”

For even more detailed information and a step-by-step walkthrough of the techniques discussed in this article, be sure to check out my YouTube video. In the video, I dive deeper into each process, offering visual demonstrations and additional tips to help you master realistic skin creation in ZBrush. You can watch it [this video]

(https://www.youtube.com/@mrnunez3D)

#### Step 1: Start with the Basics — Laying the Foundation

Before diving into the intricate details, it’s essential to get the foundational shapes and forms right. Begin by focusing on the soft, underlying forms of the face and body. This is where you establish the overall structure, ensuring that the character’s anatomy is believable.

Using the standard and smooth brushes in ZBrush, work on defining the major planes of the face, paying close attention to bone structure and muscle placement. This step is crucial, as it sets the stage for the finer details that will come later. It’s tempting to jump straight into the high-frequency details, but without a solid foundation, even the most detailed skin will look off.

#### Step 2: Introducing Surface Noise — Adding Realism

Once you’ve established the basic forms, it’s time to add some surface noise to break up the smoothness. This step is key to making the skin look more realistic. In ZBrush, the Surface Noise feature allows you to apply a variety of textures, from subtle pores to more pronounced wrinkles.

By tweaking the noise parameters, you can fine-tune the intensity to match the look you’re going for. Whether you want the skin to be slightly rough or smooth, adjusting the scale and strength of the noise will help you get there. It’s a powerful way to ensure that the skin doesn’t appear too flat or too exaggerated.

#### Step 3: Applying Texturing XYZ Maps — The Game-Changer

To take your detailing to the next level, you can utilize Texturing XYZ maps. These maps are high-resolution skin textures that capture the intricate details of real human skin, including pores, wrinkles, and fine lines. By overlaying these maps onto your model, you can achieve a level of realism that’s difficult to achieve manually.

“Texturing XYZ maps can really speed up your workflow, letting you add those fine skin details quickly and with more precision.”

In ZBrush, you can apply these maps as displacement maps, allowing the fine details to be embedded directly into your model’s geometry. This step brings out the finest details and makes your character’s skin look incredibly lifelike.

#### Step 4: Fine-Tuning the Details — Controlling Sharpness and Intensity

Now that you’ve laid down the basics and added surface details, it’s time to fine-tune. Controlling the sharpness of the details is crucial. By adjusting the values in ZBrush, you can ensure that the details are neither too overpowering nor too subtle.

For more control, you can mask out specific areas of the face, allowing you to apply different levels of detail to different regions. This technique is especially useful when working on areas like the lips, eyes, and forehead, where the skin texture varies greatly.

“Take your time to explore your references — understanding skin landmarks and asymmetry is the key to crafting truly lifelike 3D characters.”

#### Step 5: Final Touches — Custom Brushes and Patience

As you move towards the finishing stages, don’t hesitate to create and use custom brushes for specific details. Whether it’s a brush that mimics the look of fine pores or one that adds subtle bumps, custom brushes can save you time and give you more control over the final result.

However, the key to achieving realistic skin lies not just in the tools but in your approach. Patience is essential. Great art doesn’t happen overnight, and every tiny pore, wrinkle, and subtle bump takes time to perfect. It’s these small details that make your character feel real and full of life.

#### Conclusion: The Art of Patience and Persistence

Creating realistic skin in ZBrush is as much about technical skill as it is about persistence. It’s a process that requires time, attention to detail, and a lot of patience. But the reward is a character that looks believable and alive.

If you ever feel overwhelmed, remember that there’s always a smarter, more efficient way to get those details right. Tools like XYZ maps can save you hours of manual work, letting you focus on what really matters — bringing your vision to life.

So, keep sculpting, keep practicing, and most importantly, stay patient. The journey is part of the fun, and every hour you put in will make your final result that much more rewarding. Enjoy the process, and happy sculpting!

Stay Connected

If you found this guide helpful and want to see more of my work or follow along with my latest projects, you can connect with me on social media:

For more discussions, tips, and to connect with other artists, feel free to join the ArtHeroes Discord group. It’s a great community for anyone passionate about 3D art and character creation.

Thanks for reading, and happy sculpting!


Report

CatGirl Art Challenge

General / 17 May 2024

🚨#MrnunezChallenge ✅ CatGirls and CatBoys ദ്ദി(• ˕ •マ.ᐟ May 20th-June2nd

I would like to announce the incoming MrNunez/XPPen challenge! All the exciting details and prizes will be revealed next Monday!

https://subscribepage.io/mrnunezchallenge

🔴Tune in LIVE on YouTube next May 20th for the big kickoff! 🔥

https://www.youtube.com/watch?v=nKRWYHGl7K8

🎁 Don't miss out!

This is a great chance to join in the fun and showcase your unique style

Thanks to to the original concept Artist @ztiromart !

#catgirl I sculpted with the @XPPen Artist 15.6 Pro tablet.
Report

Why did I chage my Wacom Tablet ?

General / 03 April 2024


2 months ago I had my very last Wacom Driver issue: Driver not found. Im sure you know what I am talking about!

So I decided to jump into the market on the search of a new Drawing tablet. My requests:

- Reliable

- good price

- Pen sensitivity

I've been working with the nw XenceLabs tablet for the last 2 months and I am very suprised with the results. Here you can find my personal review on this tablet. Hope you enjoy it!

Report

Sculpting scales inside Zbrush

General / 23 February 2024

Decided to release my Lizard reptile Alpha pack for Zbrush for free, along with a tutorial on how to use it. This is from a project I did a while ago for National Geographic ad, where I had to sculpt all the high frequency detail. Hope you guys find it useful!


Base model was created by the master Rafa Zabala


Report

Ruby Rohd UE5

General / 11 April 2023

Moving forward with #digiRuby inside Epic Games UE5

More shots and progress: https://www.instagram.com/mrnunez/

For anyone interested: if you have weird normals on the mesh, you need to recompute normal tangents on the skeletal mesh after import. This took me a while to figure out to be honest 😂. This also helped to solve groom bindings and now the hair work as expected .

#ue5 #epicgames #digitalhumans #realtimerendering #3dart


Report

ArtHeroes Likeness Program

General / 28 January 2021

ArtHeroes Likeness Program:https://artheroes.co/likeness-program

Realtime Jordan I created for the Likeness Program at ArtHeroes. The intention with this project is to display all the process in building any likeness from 0. The course covers all the face anatomy landmarks you need to know, the full process as long with the LookDev breakdown ;)


Report

Aquaman skin, hair and likeness update

General / 25 May 2020

kin and eye divergence update, so subtle! what do you think ? Also implemented peach fuzz 🍑 and improved all Xgen descriptions
Implemented the XYZ micro displacement into the shader to enhance the porosity, also made a second pass on the skin texture. The more I work the skin albedo the more I think I should have use zbrush from the beginning for the polypaint.....doing this type of job in MARI is a pain in the butt. Anyway slightly better now.

Placeholders for all the remain elements, I just need to find time to finish them....lately workload is killing me :) I hope you guys like the progress and let me know what do you think? 


man


Report

Aquaman - Xgen Hair WIP

General / 01 April 2020

Hair wip from the Aquaman portrait I am working on. You can see the hair, beard and eyebrows workflow on my Instagram

https://www.instagram.com/mrnunez/


Report